WKWebViewのDesign Patterns実践|Builder・Strategy・Chain of Responsibilityで効率開発
iOS WKWebViewの封装で直面する課題を、Builder・Strategy・Chain of ResponsibilityのDesign Patternsで解決。コードの保守性と拡張性を向上させる具体的実装例を紹介します。
本記事は AI による翻訳をもとに作成されています。表現が不自然な箇所がありましたら、ぜひコメントでお知らせください。
記事一覧
Design Patterns の実践応用記録—WKWebViewでのBuilder、Strategy、Chain of Responsibilityパターンの活用
iOS WKWebView を封装する際に使用するデザインパターンの場面(ストラテジー、チェーン・オブ・レスポンシビリティ、ビルダー・パターン)。
{:target="_blank"}](/assets/f4b02ee342a4/1*pwh6uN0WQNWPa8zmSSyMXA.webp)
Photo by Dean Pugh
デザインパターンについて
Design Patterns を語る前に必ず言いたいのは、最も古典的な GoF の23種類のデザインパターンが発表されてから既に30年が経過していること(1994年発行)です。ツールや言語の変化、ソフトウェア開発の手法の進化により、当時とは全く異なる状況になっています。その後、様々な分野で多くの新しいデザインパターンも生まれています。Design Patterns は万能解でも唯一の解でもなく、むしろ「言語の代名詞」のようなもので、適切な場面で適切なデザインパターンを適用することで、開発協力の障害を減らせます。例えば、ここで戦略パターンを適用すれば、後から保守や拡張を行う人は戦略パターンの構造に従って直接イテレーションできます。また、デザインパターンは多くの場合、良好に疎結合を実現しており、拡張性やテストのしやすさにも大きく貢献します。
デザインパターンの使用心得
唯一の解決策ではありません
万能ではありません
無理に当てはめるのではなく、解決したい問題の種類(生成?振る舞い?構造?)や目的に応じて適切なデザインパターンを選択する必要があります。
魔改造は避けるべきです。魔改造は後続のメンテナンス担当者に誤解を招きやすいためです。言語と同じで、皆が「Apple」を使うのに、自分だけ「Banana」と定義すると、特別に理解する必要があり開発コストが増えてしまいます。
できるだけキーワードを避けてください。例えば Factory Pattern は慣例的に
XXXFactoryと命名しますが、工場パターンでない場合はこの命名キーワードを使うべきではありません。慎重に自分でパターンを作ること。前述のように古典的なパターンは23種類しかありませんが、多くの分野で長年進化してきたため、新しいパターンも多数存在します。まずはネットの資料を参考に適切なパターンを見つけましょう(三人寄れば文殊の知恵と言いますし)。どうしても無ければ、新しい設計パターンを提案し、可能な限り発表して異なる分野や状況の人々と検討・調整を行いましょう。
プログラムは結局のところ人がメンテナンスするためのものなので、メンテナンスしやすく拡張しやすければ、必ずしもデザインパターンを使う必要はありません。
チームでデザインパターンの共通理解がある場合にのみ使用すべきです
Design Pattern はさらに Design Pattern を組み合わせることができる技術です
デザインパターンは実務で繰り返し経験を積むことで、どのような場面に適しているか、また適していないかの感覚が鋭くなっていきます。
補助ツール ChatGPT

ChatGPTが登場してから、デザインパターンの実践的な応用を学ぶのがより簡単になりました。具体的な問題を伝えれば、その場面に適したデザインパターンをいくつか提案し、説明も添えてくれます。すべての回答が完璧に合うわけではありませんが、少なくともいくつかの実行可能な方向性を示してくれるので、それらのパターンを自分の実務シーンに合わせて深掘りすれば、最終的に良い解決策を選べます。
WKWebView のデザインパターン実践応用シーン
今回の Design Patterns 実践応用は、現在のコードベースにある WKWebView オブジェクトの機能特性を集約し、統一された WKWebView コンポーネントを開発する際に、いくつかの適切な論理抽象ポイントで Design Patterns を適用した経験の共有です。
完全なデモプロジェクトのコードは記事の最後に添付します。
元の抽象化されていない書き方
1
2
3
4
5
6
7
8
9
10
11
12
13
14
15
16
17
18
19
20
21
22
23
24
25
26
27
28
29
30
31
32
33
34
35
36
37
38
39
40
41
42
43
44
45
46
47
48
49
50
51
52
53
54
55
56
57
58
59
60
61
62
63
64
65
66
67
68
69
70
71
72
73
74
75
class WKWebViewController: UIViewController {

    // MARK - いくつかの変数やスイッチを定義し、外部から init 時に特性を注入できるように...

    // ビジネスロジックのシミュレーション:特殊パスにマッチしたらネイティブ画面を開くスイッチ
    let noNeedNativePresent: Bool
    // ビジネスロジックのシミュレーション:DeeplinkManager のチェックスイッチ
    let deeplinkCheck: Bool
    // ビジネスロジックのシミュレーション:ホームページかどうか?
    let isHomePage: Bool
    // ビジネスロジックのシミュレーション:WKWebView に注入する WKUserScript のスクリプト
    let userScripts: [WKUserScript]
    // ビジネスロジックのシミュレーション:WKWebView に注入する WKScriptMessageHandler のスクリプト
    let scriptMessageHandlers: [String: WKScriptMessageHandler]
    // WebView からタイトルを取得して ViewController のタイトルを上書きするかどうか
    let overrideTitleFromWebView: Bool

    let url: URL

    // ...
}
// ...
extension OldWKWebViewController: WKNavigationDelegate {
    // MARK - iOS WKWebView の navigationAction Delegate、読み込もうとしているリンクの処理方法を決定するために使用
    // 終了時には必ず decisionHandler(.allow) または decisionHandler(.cancel) を呼び出すこと
    // decisionHandler(.cancel) は読み込みを中断する

    // ここでは異なる変数やスイッチによって異なるロジック処理をシミュレート:

    func webView(_ webView: WKWebView, decidePolicyFor navigationAction: WKNavigationAction, decisionHandler: @escaping (WKNavigationActionPolicy) -> Void) {
        guard let url = navigationAction.request.url else {
            decisionHandler(.allow)
            return
        }

        // ビジネスロジックのシミュレーション:WebViewController の deeplinkCheck == true(DeepLinkManager のチェックを行いページを開く必要がある)
        if deeplinkCheck {
            print("DeepLinkManager.open(\(url.absoluteString)")
            // DeepLinkManager のロジックをシミュレート、URL が成功すれば開いて処理を終了
            // if DeepLinkManager.open(url) == true {
                decisionHandler(.cancel)
                return
            // }
        }

        // ビジネスロジックのシミュレーション:WebViewController の isHomePage == true(ホームページを開いている)かつ WebView がホームページを閲覧中の場合、TabBar のインデックスを切り替え
        if isHomePage {
            if url.absoluteString == "https://zhgchg.li" {
                print("UITabBarController をインデックス 0 に切り替え")
                decisionHandler(.cancel)
            }
        }

        // ビジネスロジックのシミュレーション:WebViewController の noNeedNativePresent == false(特殊パスにマッチしてネイティブ画面を開く必要がある)
        if !noNeedNativePresent {
            if url.pathComponents.count >= 3 {
                if url.pathComponents[1] == "product" {
                    // http://zhgchg.li/product/1234 にマッチ
                    let id = url.pathComponents[2]
                    print("ProductViewController(\(id) を表示")
                    decisionHandler(.cancel)
                } else if url.pathComponents[1] == "shop" {
                    // http://zhgchg.li/shop/1234 にマッチ
                    let id = url.pathComponents[2]
                    print("ShopViewController(\(id) を表示")
                    decisionHandler(.cancel)
                }
                // その他...
            }
        }

        decisionHandler(.allow)
    }
}
// ...
問題
クラス内に変数やフラグが並んでおり、どれが設定用なのか分かりにくい
直接 WKUserScript 変数を外部に公開するのではなく、注入するJSを管理し、特定の動作のみを許可したいです。
WKScriptMessageHandler の登録ルールを制御できない
ほぼ同じ WebView を初期化する場合、注入パラメータのルールを繰り返し書く必要があり、パラメータルールを再利用できません。
navigationAction Delegate内部は変数でフローを制御しており、フローや順序を削除・変更する場合はコード全体に手を加える必要があり、正常に動作していたフローを壊す可能性もあります。
Builder Pattern ビルダーパターン
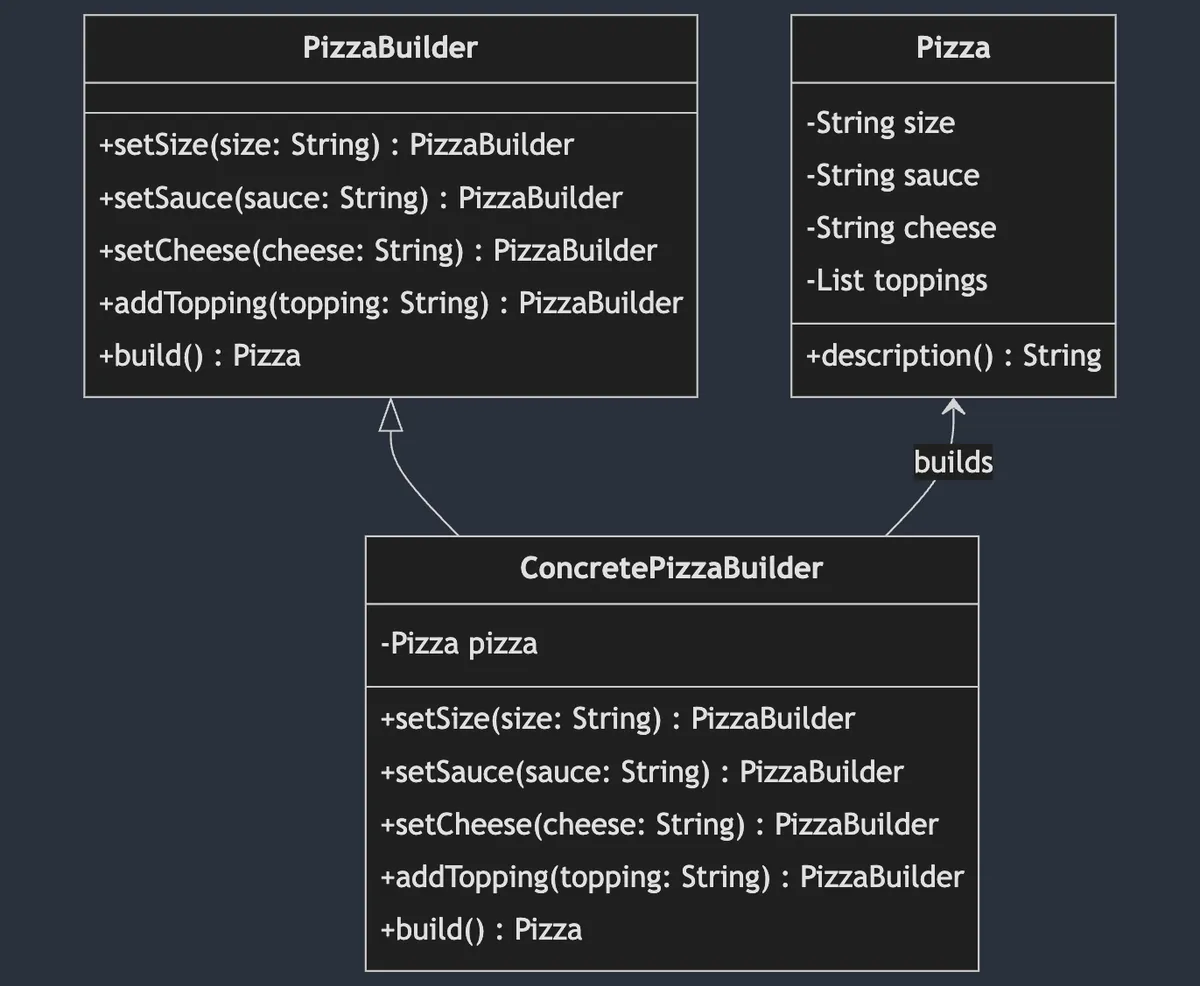
Builder Pattern(ビルダーパターン)は 生成型 デザインパターンに属し、オブジェクト生成の手順とロジックを分離します。操作する側はステップごとにパラメータを設定して設定を再利用でき、最後に目的のオブジェクトを生成します。また、同じ生成手順で異なるオブジェクトを作成することも可能です。
上図はピザ作りを例に、まずピザ作りの手順をいくつかのメソッドに分け、PizzaBuilder というプロトコル(インターフェース)で宣言しています。ConcretePizzaBuilder は実際にピザを作るオブジェクトで、ベジタリアンPizzaBuilder や ミートPizzaBuilder などが考えられます。異なるビルダーは材料が異なる場合がありますが、最終的には build() で Pizza オブジェクトを生成します。
WKWebView シーン
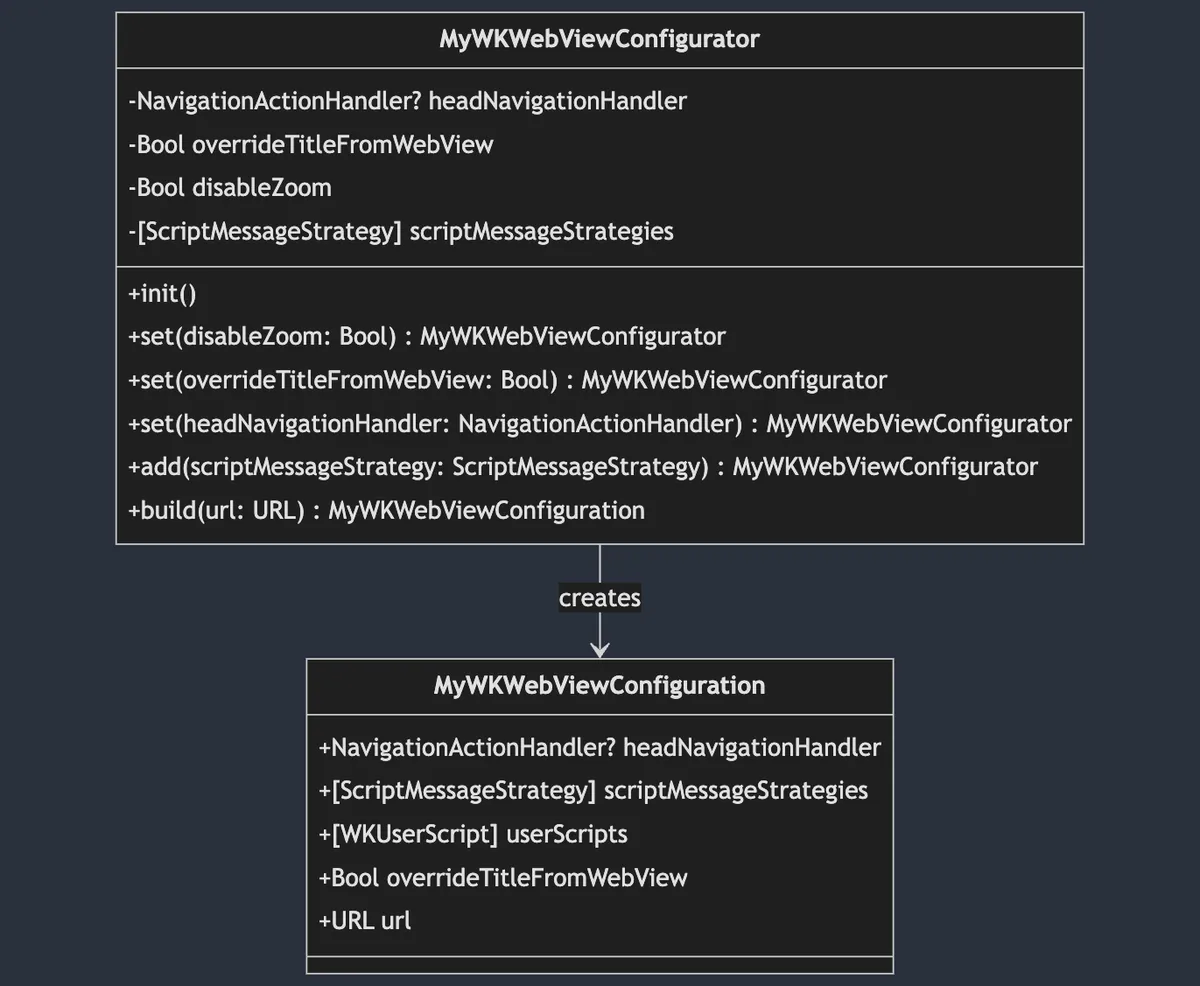
WKWebView のシーンに戻ると、最終的な生成物は MyWKWebViewConfiguration です。すべての WKWebView に必要な設定変数をこのオブジェクトに統一して格納し、Builder パターンの MyWKWebViewConfigurator を使って段階的に Configuration の構築を行います。
1
2
3
4
5
6
7
8
public struct MyWKWebViewConfiguration {
    let headNavigationHandler: NavigationActionHandler?
    let scriptMessageStrategies: [ScriptMessageStrategy]
    let userScripts: [WKUserScript]
    let overrideTitleFromWebView: Bool
    let url: URL
}
// すべてのパラメータはモジュール内のみ公開(Internal)
MyWKWebViewConfigurator(ビルダーパターン)
ここでは MyWKWebView のビルドだけが必要なため、
MyWKWebViewConfiguratorをさらにプロトコル(インターフェース)に分割していません。
1
2
3
4
5
6
7
8
9
10
11
12
13
14
15
16
17
18
19
20
21
22
23
24
25
26
27
28
29
30
31
32
33
34
35
36
37
38
39
40
41
42
43
44
45
46
public final class MyWKWebViewConfigurator {

    private var headNavigationHandler: NavigationActionHandler? = nil
    private var overrideTitleFromWebView: Bool = true
    private var disableZoom: Bool = false
    private var scriptMessageStrategies: [ScriptMessageStrategy] = []

    public init() {

    }

    // パラメータのカプセル化と内部制御
    public func set(disableZoom: Bool) -> Self {
        self.disableZoom = disableZoom
        return self
    }

    public func set(overrideTitleFromWebView: Bool) -> Self {
        self.overrideTitleFromWebView = overrideTitleFromWebView
        return self
    }

    public func set(headNavigationHandler: NavigationActionHandler) -> Self {
        self.headNavigationHandler = headNavigationHandler
        return self
    }

    // 新しいロジックルールをここにカプセル化可能
    public func add(scriptMessageStrategy: ScriptMessageStrategy) -> Self {
        scriptMessageStrategies.removeAll(where: { type(of: $0).identifier == type(of: scriptMessageStrategy).identifier })
        scriptMessageStrategies.append(scriptMessageStrategy)
        return self
    }

    public func build(url: URL) -> MyWKWebViewConfiguration {
        var userScripts:[WKUserScript] = []
        // 生成時にのみ追加
        if disableZoom {
            let script = "var meta = document.createElement('meta'); meta.name='viewport'; meta.content='width=device-width, initial-scale=1.0, maximum-scale=1.0, user-scalable=no'; document.getElementsByTagName('head')[0].appendChild(meta);"
            let disableZoomScript = WKUserScript(source: script, injectionTime: .atDocumentEnd, forMainFrameOnly: true)
            userScripts.append(disableZoomScript)
        }

        return MyWKWebViewConfiguration(headNavigationHandler: headNavigationHandler, scriptMessageStrategies: scriptMessageStrategies, userScripts: userScripts, overrideTitleFromWebView: overrideTitleFromWebView, url: url)
    }
}
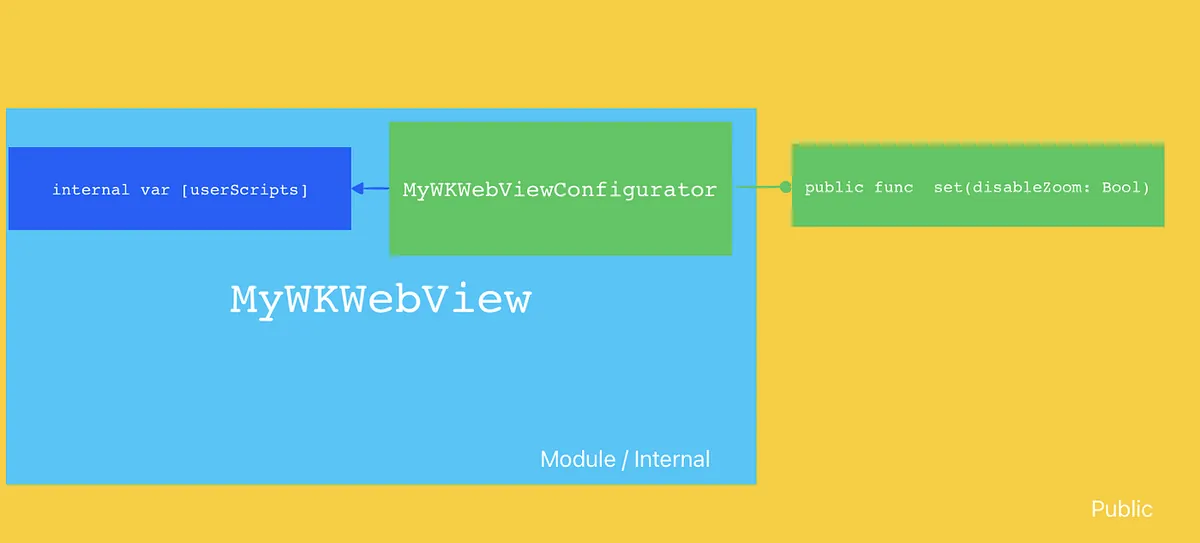
一層多く分けることで、Access Control を使ってパラメータの使用権限をより良く隔離できます。本シナリオでは、WKUserScript を直接 MyWKWebView に注入したいが、使う側が自由に注入できるように大きく開放したくない場合です。そこで Builder Pattern と Swift の Access Control を組み合わせ、MyWKWebView がモジュール内に置かれた後、MyWKWebViewConfigurator は外部に操作メソッド func set(disableZoom: Bool) を公開し、内部で MyWKWebViewConfiguration を生成するときに WKUserScript を付加します。MyWKWebViewConfiguration の全パラメータは外部から変更不可で、MyWKWebViewConfigurator 経由でのみ生成可能です。
MyWKWebViewConfigurator + シンプルファクトリー
MyWKWebViewConfigurator ビルダーができたら、簡単なファクトリーを作成して、構築手順を再利用できます。
1
2
3
4
5
6
7
8
9
10
11
12
13
14
15
16
17
18
19
20
21
struct MyWKWebViewConfiguratorFactory {
    enum ForType {
        case `default`
        case productPage
        case payment
    }

    static func make(for type: ForType) -> MyWKWebViewConfigurator {
        switch type {
        case .default:
            return MyWKWebViewConfigurator()
                .add(scriptMessageStrategy: PageScriptMessageStrategy()) // ページのスクリプトメッセージ戦略を追加
                .set(overrideTitleFromWebView: false) // WebViewからのタイトル上書きを無効
                .set(disableZoom: false) // ズームを無効にしない
        case .productPage:
            return Self.make(for: .default).set(disableZoom: true).set(overrideTitleFromWebView: true) // ズーム無効とタイトル上書きを有効に設定
        case .payment:
            return MyWKWebViewConfigurator().set(headNavigationHandler: paymentNavigationActionHandler) // 支払い用のナビゲーションハンドラを設定
        }
    }
}
Chain of Responsibility Pattern 責任連鎖パターン
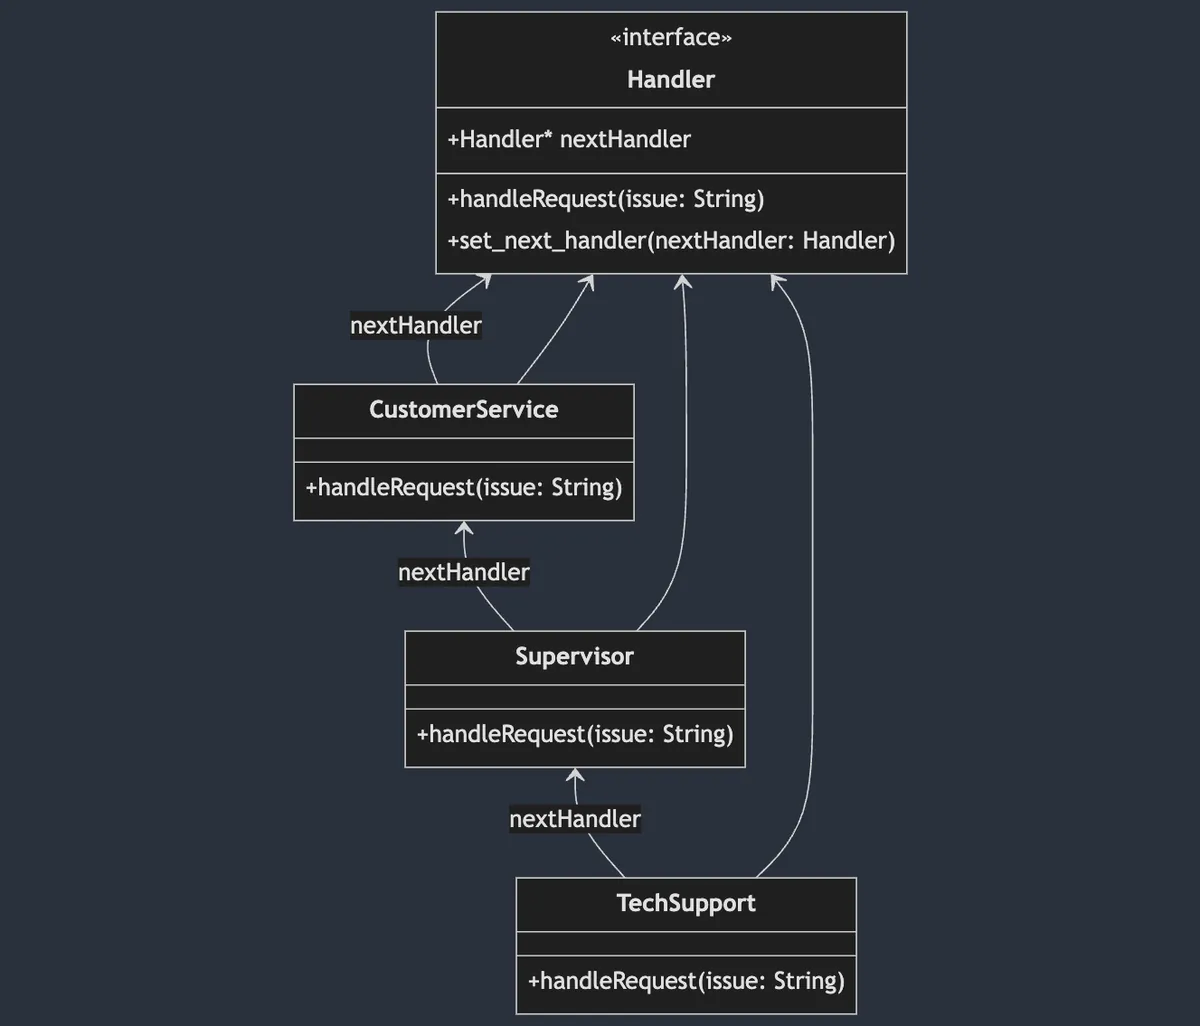
責任連鎖パターン(Chain of Responsibility Pattern)は振る舞い型デザインパターンに属し、オブジェクトの処理をカプセル化してチェーン構造で連結します。リクエストはチェーンに沿って伝達され、処理されるまで続きます。連結された処理のカプセル化により、自由に組み合わせや順序変更が可能です。
責任の連鎖は、入力されたものを処理するかどうかに注目し、処理しなければスキップします 。したがって、途中で処理を部分的に行ったり、入力オブジェクトを変更して次に渡すことはできません。もしそのような要件がある場合は別の Interceptor Pattern になります。
上図は Tech Support(または OnCall…)を例にしています。問題オブジェクトが入るとまず CustomerService を通り、処理できなければ次の階層の Supervisor に渡します。さらに処理できなければ TechSupport に渡ります。また、異なる問題に対して異なる責任連鎖を構成することも可能で、例えば大口顧客の問題は直接 Supervisor から処理を開始します。Swift UIKit の Responder Chain でも責任連鎖パターンが使われており、UI上のユーザー操作に応答しています。
WKWebView シーン
私たちの WKWebView のシナリオでは、主に func webView(_ webView: WKWebView, decidePolicyFor navigationAction: WKNavigationAction, decisionHandler: @escaping (WKNavigationActionPolicy) -> Void) という Delegate メソッドに適用しています。
システムがURLリクエストを受け取ると、このメソッドを通じて遷移を許可するかどうかを判断し、処理終了時に
decisionHandler(.allow)またはdecisionHandler(.cancel)を呼び出して結果を通知します。
WKWebViewの実装では、多くの判定や特定のページ処理が他と異なり、回避が必要になることがあります:
1
2
3
4
5
6
7
8
9
10
11
12
13
14
15
16
17
18
19
20
21
22
23
24
25
26
27
28
29
30
31
32
33
34
35
36
37
38
39
40
41
42
43
44
45
46
// 元の書き方...
func webView(_ webView: WKWebView, decidePolicyFor navigationAction: WKNavigationAction, decisionHandler: @escaping (WKNavigationActionPolicy) -> Void) {
        guard let url = navigationAction.request.url else {
            decisionHandler(.allow)
            return
        }

        // ビジネスロジックの模擬:WebViewControllerのdeeplinkCheck == true(DeepLinkManagerでチェックしてページを開く必要があることを示す)
        if deeplinkCheck {
            print("DeepLinkManager.open(\(url.absoluteString)")
            // DeepLinkManagerのロジックを模擬、URLが正常に開けたら開いて処理を終了。
            // if DeepLinkManager.open(url) == true {
                decisionHandler(.cancel)
                return
            // }
        }

        // ビジネスロジックの模擬:WebViewControllerのisHomePage == true(ホームページを開いていることを示す)&WebViewがホームページを閲覧中の場合、TabBarのインデックスを切り替える
        if isHomePage {
            if url.absoluteString == "https://zhgchg.li" {
                print("UITabBarControllerをインデックス0に切り替え")
                decisionHandler(.cancel)
            }
        }

        // ビジネスロジックの模擬:WebViewControllerのnoNeedNativePresent == false(特定パスにマッチしてネイティブ画面を開く必要があることを示す)
        if !noNeedNativePresent {
            if url.pathComponents.count >= 3 {
                if url.pathComponents[1] == "product" {
                    // http://zhgchg.li/product/1234 にマッチ
                    let id = url.pathComponents[2]
                    print("ProductViewControllerを表示(\(id)")
                    decisionHandler(.cancel)
                } else if url.pathComponents[1] == "shop" {
                    // http://zhgchg.li/shop/1234 にマッチ
                    let id = url.pathComponents[2]
                    print("ShopViewControllerを表示(\(id)")
                    decisionHandler(.cancel)
                }
                // その他...
            }
        }

        // その他...
        decisionHandler(.allow)
}
時間が経つにつれて機能が複雑になり、ここでのロジックも増えていきます。さらに処理の順序まで変わると、大変なことになります。
NavigationActionHandler(責任連鎖パターン)
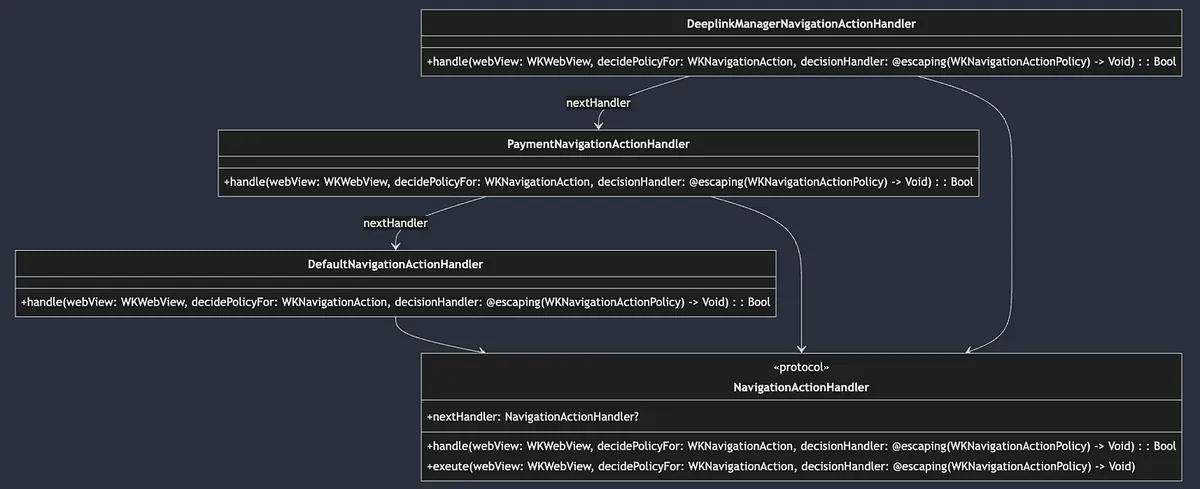
まずは Handler プロトコルを定義する:
public protocol NavigationActionHandler: AnyObject {
    var nextHandler: NavigationActionHandler? { get set }

    /// Webビューのナビゲーションアクションを処理します。処理された場合はtrueを返し、そうでなければfalseを返します。
    func handle(webView: WKWebView, decidePolicyFor navigationAction: WKNavigationAction, decisionHandler: @escaping (WKNavigationActionPolicy) -> Void) -> Bool
    /// ナビゲーションアクションのポリシー決定を実行します。現在のハンドラーが処理しない場合は、チェーン内の次のハンドラーが実行されます。
    func exeute(webView: WKWebView, decidePolicyFor navigationAction: WKNavigationAction, decisionHandler: @escaping (WKNavigationActionPolicy) -> Void)
}

public extension NavigationActionHandler {
    func exeute(webView: WKWebView, decidePolicyFor navigationAction: WKNavigationAction, decisionHandler: @escaping (WKNavigationActionPolicy) -> Void) {
        if !handle(webView: webView, decidePolicyFor: navigationAction, decisionHandler: decisionHandler) {
            self.nextHandler?.exeute(webView: webView, decidePolicyFor: navigationAction, decisionHandler: decisionHandler) ?? decisionHandler(.allow)
        }
    }
}
操作は
func handle()内で実装され、次の処理がある場合はtrueを返し、そうでなければfalseを返しますfunc execute()はデフォルトのチェーンアクセス実装で、ここから操作チェーン全体の走査を実行します。デフォルトの動作は、func handle()がfalse(このノードが処理できないことを意味する)を返した場合、自動的に次のnextHandlerのexecute()を呼び出して処理を続行し、最後まで実行されます。
実装:
1
2
3
4
5
6
7
8
9
10
11
12
13
14
15
16
17
18
19
20
21
22
23
24
25
26
27
28
29
30
31
32
33
34
35
36
37
38
39
40
41
42
43
44
45
46
47
48
49
50
51
// デフォルト実装、通常は最後に配置
public final class DefaultNavigationActionHandler: NavigationActionHandler {
    public var nextHandler: NavigationActionHandler?

    public init() {

    }

    public func handle(webView: WKWebView, decidePolicyFor navigationAction: WKNavigationAction, decisionHandler: @escaping (WKNavigationActionPolicy) -> Void) -> Bool {
        decisionHandler(.allow)
        return true
    }
}

//
final class PaymentNavigationActionHandler: NavigationActionHandler {
    var nextHandler: NavigationActionHandler?

    func handle(webView: WKWebView, decidePolicyFor navigationAction: WKNavigationAction, decisionHandler: @escaping (WKNavigationActionPolicy) -> Void) -> Bool {
        guard let url = navigationAction.request.url else {
            return false
        }

        // ビジネスロジックの例:Payment 支払い関連、二段階認証 WebView...など
        print("支払い確認ビューコントローラーを表示")
        decisionHandler(.cancel)
        return true
    }
}

//
final class DeeplinkManagerNavigationActionHandler: NavigationActionHandler {
    var nextHandler: NavigationActionHandler?

    func handle(webView: WKWebView, decidePolicyFor navigationAction: WKNavigationAction, decisionHandler: @escaping (WKNavigationActionPolicy) -> Void) -> Bool {
        guard let url = navigationAction.request.url else {
            return false
        }


        // DeepLinkManager ロジックの例、URLが正常に開ければ開いて処理を終了。
        // if DeepLinkManager.open(url) == true {
            decisionHandler(.cancel)
            return true
        // } else {
            return false
        //
    }
}

// More...
使用:
1
2
3
4
5
6
7
8
9
10
11
12
extension MyWKWebViewController: WKNavigationDelegate {
    public func webView(_ webView: WKWebView, decidePolicyFor navigationAction: WKNavigationAction, decisionHandler: @escaping (WKNavigationActionPolicy) -> Void) {
       let headNavigationActionHandler = DeeplinkManagerNavigationActionHandler()
       let defaultNavigationActionHandler = DefaultNavigationActionHandler()
       let paymentNavigationActionHandler = PaymentNavigationActionHandler()

       headNavigationActionHandler.nextHandler = paymentNavigationActionHandler
       paymentNavigationActionHandler.nextHandler = defaultNavigationActionHandler

       headNavigationActionHandler.exeute(webView: webView, decidePolicyFor: navigationAction, decisionHandler: decisionHandler)
    }
}
このようにリクエストを受け取ると、定義した処理チェーンに従って順番に処理されます。
前述の Builder Pattern と組み合わせて MyWKWebViewConfigurator の headNavigationActionHandler をパラメータとして外部から渡すことで、この WKWebView の処理要件や順序を外部で決定できるようになります:
1
2
3
4
5
6
7
8
9
10
11
12
13
14
15
16
17
18
19
20
21
22
23
24
25
26
27
28
29
30
31
32
33
34
35
36
37
38
39
40
41
42
43
44
45
46
47
48
extension MyWKWebViewController: WKNavigationDelegate {
    public func webView(_ webView: WKWebView, decidePolicyFor navigationAction: WKNavigationAction, decisionHandler: @escaping (WKNavigationActionPolicy) -> Void) {
        configuration.headNavigationHandler?.exeute(webView: webView, decidePolicyFor: navigationAction, decisionHandler: decisionHandler) ?? decisionHandler(.allow)
    }
}

//...
struct MyWKWebViewConfiguratorFactory {
    enum ForType {
        case `default`
        case productPage
        case payment
    }

    static func make(for type: ForType) -> MyWKWebViewConfigurator {
        switch type {
        case .default:
            // デフォルトのケースとしてこれらのハンドラをシミュレート
            let deplinkManagerNavigationActionHandler = DeeplinkManagerNavigationActionHandler()
            let homePageTabSwitchNavigationActionHandler = HomePageTabSwitchNavigationActionHandler()
            let nativeViewControllerNavigationActionHandlera = NativeViewControllerNavigationActionHandler()
            let defaultNavigationActionHandler = DefaultNavigationActionHandler()

            deplinkManagerNavigationActionHandler.nextHandler = homePageTabSwitchNavigationActionHandler
            homePageTabSwitchNavigationActionHandler.nextHandler = nativeViewControllerNavigationActionHandlera
            nativeViewControllerNavigationActionHandlera.nextHandler = defaultNavigationActionHandler

            return MyWKWebViewConfigurator()
                .add(scriptMessageStrategy: PageScriptMessageStrategy())
                .add(scriptMessageStrategy: UserScriptMessageStrategy())
                .set(headNavigationHandler: deplinkManagerNavigationActionHandler)
                .set(overrideTitleFromWebView: false)
                .set(disableZoom: false)
        case .productPage:
            return Self.make(for: .default).set(disableZoom: true).set(overrideTitleFromWebView: true)
        case .payment:
            // 支払いページはこれらのハンドラのみ必要で、paymentNavigationActionHandlerが最優先
            let paymentNavigationActionHandler = PaymentNavigationActionHandler()
            let deplinkManagerNavigationActionHandler = DeeplinkManagerNavigationActionHandler()
            let defaultNavigationActionHandler = DefaultNavigationActionHandler()

            paymentNavigationActionHandler.nextHandler = deplinkManagerNavigationActionHandler
            deplinkManagerNavigationActionHandler.nextHandler = defaultNavigationActionHandler

            return MyWKWebViewConfigurator().set(headNavigationHandler: paymentNavigationActionHandler)
        }
    }
}
Strategy Pattern 戦略パターン
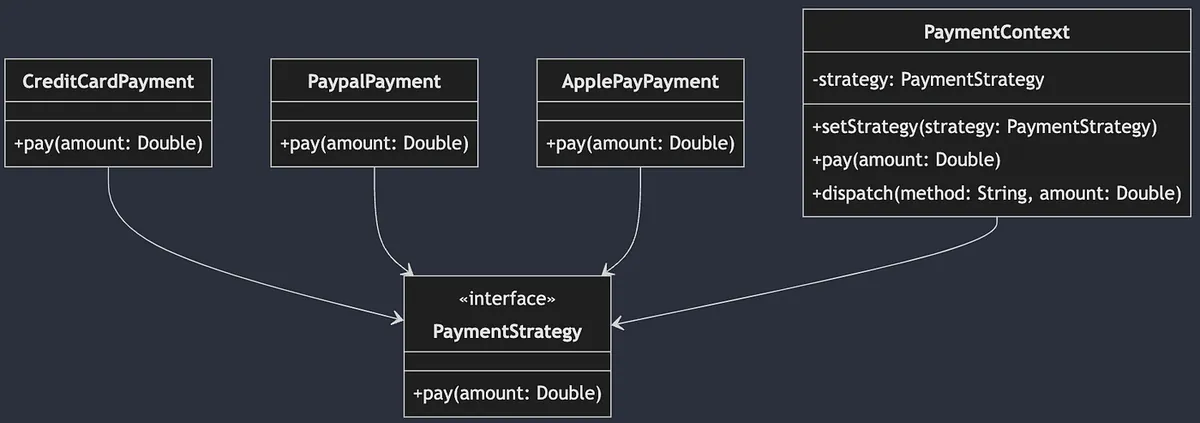
ストラテジーパターン(Strategy Pattern)は 振る舞い型 デザインパターンに属し、実際の処理を抽象化します。これにより、複数の異なる処理を実装でき、外部から状況に応じて柔軟に切り替えて使用できます。
上図は異なる支払い方法の例です。支払いを Payment プロトコル(インターフェース)として抽象化し、各支払い方法がそれぞれの実装を行います。PaymentContext(外部利用を想定)では、ユーザーが選択した支払い方法に応じて対応する Payment インスタンスを生成し、統一して pay() を呼び出して支払いを行います。
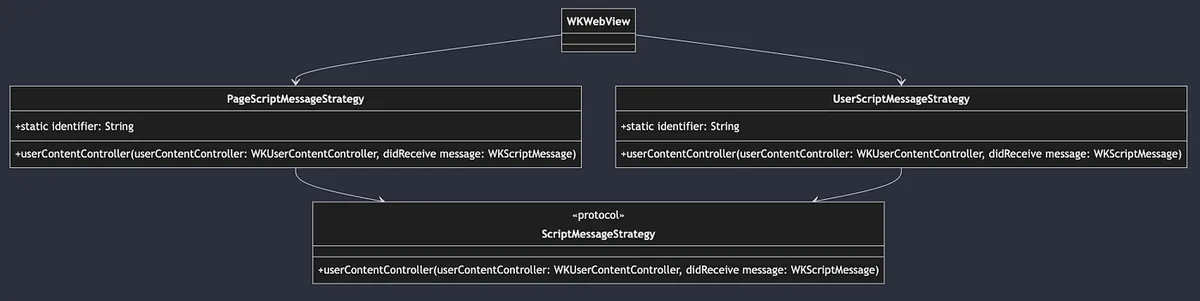
WKWebView シナリオ
WebView とフロントエンドページ間の通信に使用。
フロントエンドの JavaScript が呼び出すとき:
window.webkit.messageHandlers.Name.postMessage(Parameters);
WKWebView は対応する
NameのWKScriptMessageHandlerクラスを見つけて、処理を実行します。
システムにはすでに定義された Protocol と対応する func add(_ scriptMessageHandler: any WKScriptMessageHandler, name: String) メソッドがあり、私たちは自分の WKScriptMessageHandler 実装を定義して WKWebView に追加するだけで、システムは Strategy Pattern(戦略パターン)に従い、受け取った name に基づいて対応する具体的な戦略に処理を委譲します。
ここでは簡単に WKScriptMessageHandler を拡張した Protocol を作成し、add(.. name:) に使用するための identifier:String を追加します:
1
2
3
public protocol ScriptMessageStrategy: NSObject, WKScriptMessageHandler {
    static var identifier: String { get }
}
実装:
1
2
3
4
5
6
7
8
9
10
11
12
13
14
15
16
17
18
19
final class PageScriptMessageStrategy: NSObject, ScriptMessageStrategy {
    static var identifier: String = "page"

    func userContentController(_ userContentController: WKUserContentController, didReceive message: WKScriptMessage) {
        // jsから呼ばれた例: window.webkit.messageHandlers.page.postMessage("Close");
        print("\(Self.identifier): \(message.body)")
    }
}

//

final class UserScriptMessageStrategy: NSObject, ScriptMessageStrategy {
    static var identifier: String = "user"

    func userContentController(_ userContentController: WKUserContentController, didReceive message: WKScriptMessage) {
        // jsから呼ばれた例: window.webkit.messageHandlers.user.postMessage("Hello");
        print("\(Self.identifier): \(message.body)")
    }
}
WKWebView の登録使用:
1
2
3
4
var scriptMessageStrategies: [ScriptMessageStrategy] = []
scriptMessageStrategies.forEach { scriptMessageStrategy in
  webView.configuration.userContentController.add(scriptMessageStrategy, name: type(of: scriptMessageStrategy).identifier)
}
前述の Builder Pattern と連携して MyWKWebViewConfigurator は外部から ScriptMessageStrategy の登録を管理します:
1
2
3
4
5
6
7
8
9
10
11
12
13
14
15
16
17
18
19
20
21
22
23
24
25
26
27
public final class MyWKWebViewConfigurator {
    //...

    // 新しいロジックルールをここにカプセル化できます
    public func add(scriptMessageStrategy: ScriptMessageStrategy) -> Self {
        // ここでは identifier が重複した場合に古いものを削除するロジックを実装しています
        scriptMessageStrategies.removeAll(where: { type(of: $0).identifier == type(of: scriptMessageStrategy).identifier })
        scriptMessageStrategies.append(scriptMessageStrategy)
        return self
    }
    //...
}

//...

public class MyWKWebViewController: UIViewController {
    //...
    public override func viewDidLoad() {
        super.viewDidLoad()

        //...
        configuration.scriptMessageStrategies.forEach { scriptMessageStrategy in
            webView.configuration.userContentController.add(scriptMessageStrategy, name: type(of: scriptMessageStrategy).identifier)
        }
        //...
    }
}
Question: このシナリオは Chain of Responsibility Pattern(責任の連鎖パターン)を使ってもいいですか?
ここまで読んで、「このStrategyパターンはChain of Responsibilityパターンで代用できるのか?」と疑問に思う方もいるかもしれません。
これら二つのデザインパターンはどちらも振る舞い型であり、置き換え可能ですが、実際には要件やシナリオによります。ここでは典型的な Strategy Pattern であり、WKWebView は Name によって異なる Strategy に入るかを決定します。もし異なる Strategy 間でチェーン依存やリカバリー関係がある場合、例えば AStrategy が処理しない場合に BStrategy に渡すようなケースでは、Chain of Responsibility Pattern の使用を検討します。
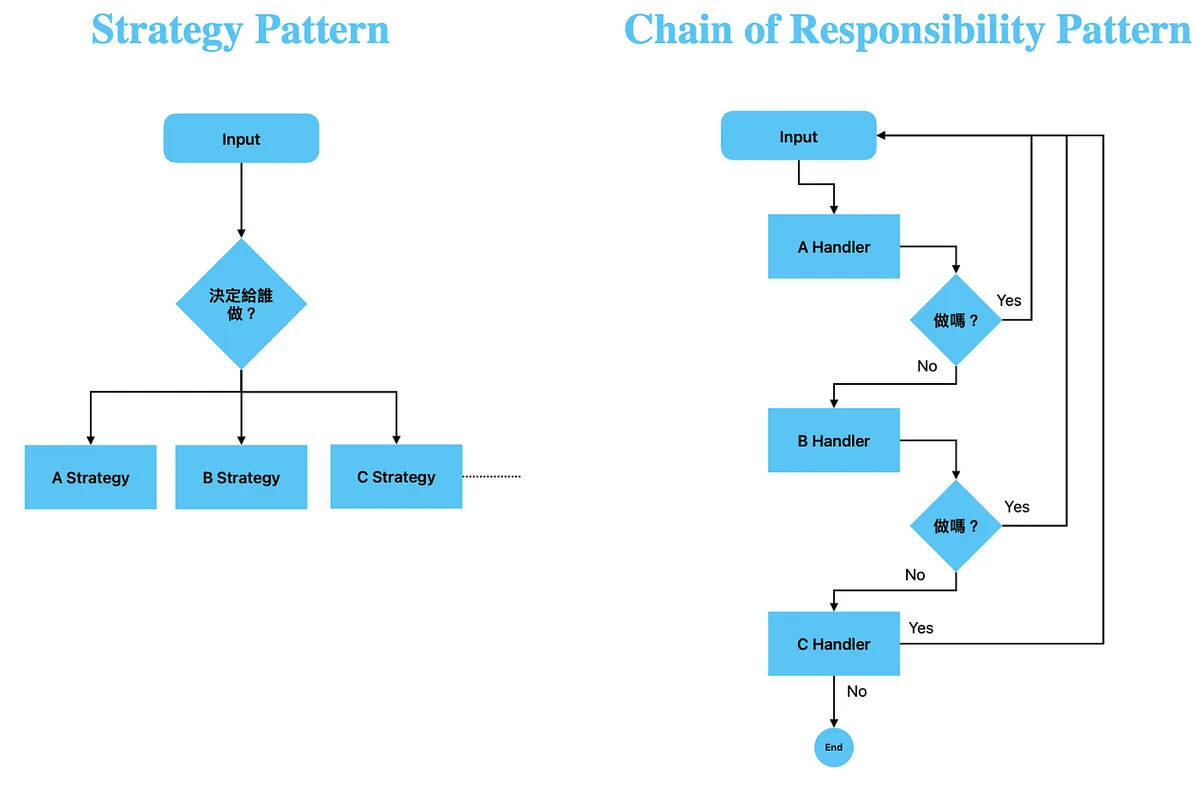
Strategy と Chain of Responsibility の違い
Strategyパターン:明確な実行戦略が既に存在し、戦略同士に関連がない場合。
責任連鎖パターン:実行する戦略は各実装で決定し、処理できない場合は次の実装に渡す。
複雑なシナリオでは、Strategy Pattern の中に Chain of Responsibility Pattern を組み合わせて実現できます。
最終組み合わせ
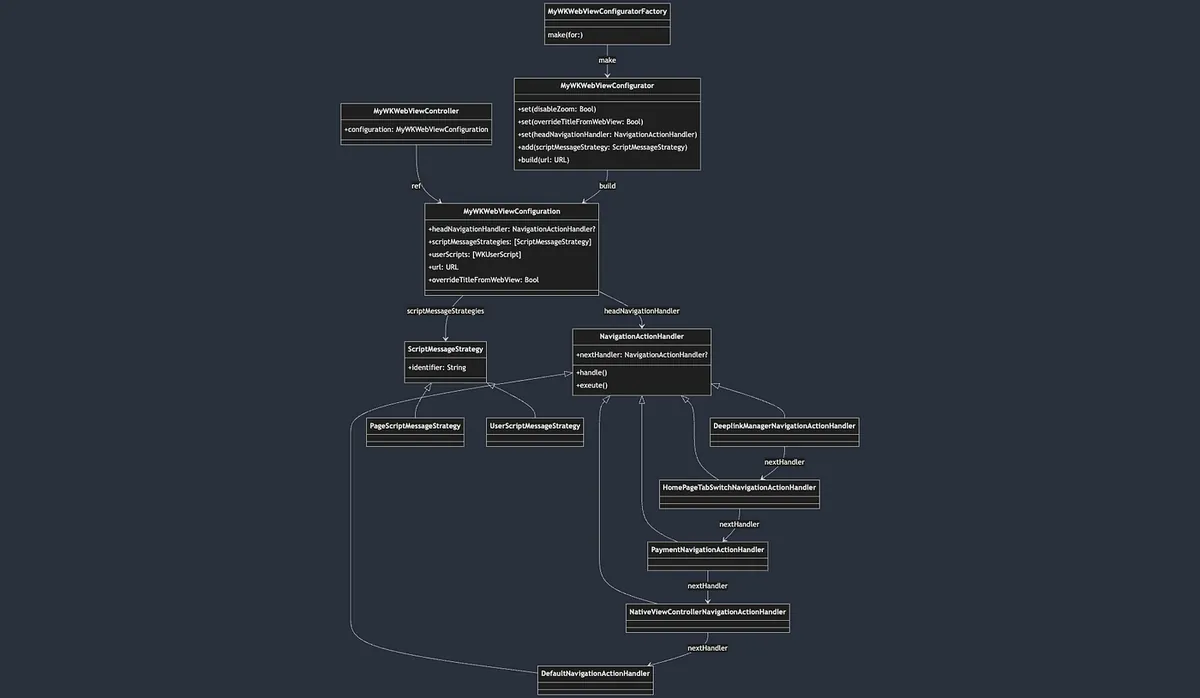
Simple Factory シンプルファクトリーパターン
MyWKWebViewConfiguratorFactory->MyWKWebViewConfiguratorの生成手順をカプセル化Builder Pattern ビルダーパターン
MyWKWebViewConfigurator->MyWKWebViewConfigurationのパラメータと構築手順をカプセル化MyWKWebViewConfigurationの注入 ->MyWKWebViewControllerで使用Chain of Responsibility Pattern 責任チェーンパターン
MyWKWebViewControllerのfunc webView(_ webView: WKWebView, decidePolicyFor navigationAction: WKNavigationAction, decisionHandler: @escaping (WKNavigationActionPolicy) -> Void)->headNavigationHandler?.exeute(webView: webView, decidePolicyFor: navigationAction, decisionHandler: decisionHandler)を呼び出し、チェーン処理を実行するStrategy Pattern 戦略パターン
MyWKWebViewControllerのwebView.configuration.userContentController.addUserScript(XXX)が対応する JS コーラーを対応する処理戦略に割り当てる
完全なデモリポジトリ
関連記事
ご質問やご意見がございましたら、こちらからご連絡ください 。
Post MediumからZMediumToMarkdownを使って変換。
本記事は Medium にて初公開されました(こちらからオリジナル版を確認)。ZMediumToMarkdown による自動変換・同期技術を使用しています。