
[CI/CD] App Store Connect API Webhook を使った自動化ワークフローの連携
App Store Connect Webhook の活用事例分析と実際の連携使用ガイド。

Photo by Volodymyr Hryshchenko
はじめに
Appleは近年、App Store Connect APIを継続的に拡充しており、開発者にとって大きな恩恵となっています。以前は証明書管理も「ハードコア」なWebセッション(有効期限があり、SMS認証コードも必要)に頼らざるを得ず、CI/CDへの統合が非常に難しかったです。また、ストアのレビューも不安定なRSSに依存するしかありませんでした。
ここ数年、ほぼ毎年新機能が追加されており、開発、テストからデプロイのプロセスだけでなく、後期の評価、財務、データレポートまで段階的にネイティブサポートされています。さらに、ユーザー管理、グループ、TestFlightなどの機能も強化され、App Store Connect API が Apple 開発者の開発体験をより良く向上させることができるようになりました。
WWDC 2025 App Store Connect APIで開発プロセスを自動化する

2025 WWDCでは待望の新機能 — Webhook通知が登場:
-
ビルドアップロードのステータス (ビルドアップロードのステータス が変更されます)
ビルドアップロードのステータスが変更されたときに関連情報を受け取ります。
Complete / Failed / Processing -
App バージョンのステータス (アプリバージョンのステータス の変更)
App バージョンのステータスが変更されたときに関連情報を受け取ります。
Prepare for Submission / Ready for Review / Waiting for Review / Ready for Distribution / Rejected… -
TestFlight バージョン状態 (新しいTestFlightフィードバック がテスターから送信されました)
テスターがフィードバック(クラッシュレポートやスクリーンショット)を送信した際に関連情報を受け取ります。 -
Apple-hosted のリソースパックの状態変更 (Apple-hostedアセットパックバージョンのステータス が変更されます)
Appleがホストするアセットパックのバージョンに特定の変更があった際に関連情報を受け取ります。
App Store Connect API / Webhook通知 :
Webhookは、あるシステムがリアルタイムでデータを別のシステムにウェブ経由で送信することを可能にします。
Webhookは、あるシステムがネットワークを介してリアルタイムにデータを別のシステムに送信する仕組みです。
従来のAPIとは異なり、データを受け取る際に一方のシステムがリクエストを送る必要はなく、Webhookはイベント発生時に即座にデータを受け取るシステムへプッシュできます。
従来のAPIとは異なり、従来のAPIはデータを受け取る側が能動的にリクエストを送る必要がありますが、Webhookはイベント発生時に即座にデータを受け取る側へプッシュします。
Webhookはイベント駆動型で、特定のアクションやイベントによりトリガーされ、関連データを事前に設定されたURL(「webhook URL」または「callback URL」とも呼ばれます)に即時送信します。
Webhookはイベント駆動型で、特定のアクションやイベントが発生したときに、関連データをあらかじめ設定したURL(「Webhook URL」または「Callback URL」とも呼ばれる)に即時に送信します。
通知Webhookは、サーバー上に作成するエンドポイントです。
通知型Webhookは、自分のサーバー上に作成したエンドポイント(endpoint)です。
このWebhookエンドポイントはApp Store ConnectからのHTTP POSTリクエストを受信します。
このWebhookエンドポイントはApp Store ConnectからのHTTP POSTリクエストを受信します。
POSTリクエストは、あなたのアプリに関する重要なイベントを通知します。
これらの POST リクエストは、あなたのアプリに関連する重要なイベントを説明します。
Webhook通知エンドポイントを使って、アプリで発生するイベントの通知を設定します。
Webhook通知エンドポイントを使用して、アプリで発生するさまざまなイベントの通知を受け取るように設定できます。
5つの活用事例
1. ビルド処理完了後に審査申請をトリガーする
以前:
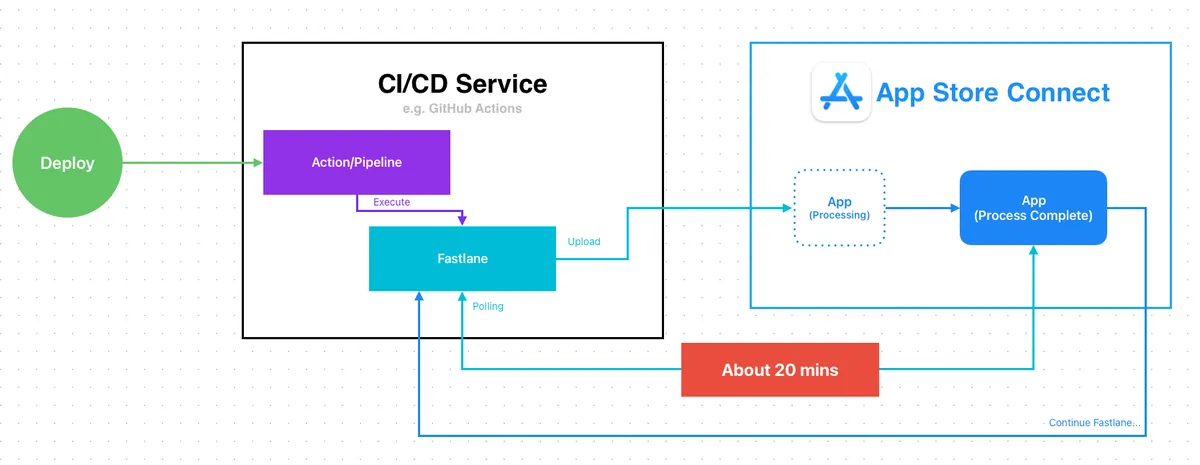
従来、AppのCI/CDパッケージ送信時には、パッケージアップロード後にAppleの処理完了を待つ必要があり、その後に審査申請を続けていました。Fastlaneのデフォルトの方法は、App Store Connectをポーリングしてアップロードしたビルドの状態を確認し、Completeになるまで審査申請のLaneを実行しません。
待ち時間は約20分 です。Self-hosted CI/CDなら問題ありませんが、クラウドサービスを利用している場合、この20分の待機時間は非常にリソースの無駄になります。例えばGitHub Runner macOSでは1分あたり0.062米ドルなので、審査待ちだけで毎回1.24米ドルの無駄なコストが発生します。

Ref: Build Completed Processing 通知信 搭配 Gmail Filter + Google Apps Script
Webhookでの自動通知がなかった時代には、「Build Completed Processing 通知メールをGmailフィルターとGoogle Apps Scriptでトリガーする」という方法を使っていましたが、少しハードコアな手順でした。
After:

-
Webhookがあれば、ビルドのアップロード完了時点で処理を終了できます。
-
App Store Connectのビルドプロセス完了後にWebhook通知が送信され、通知を受け取った後に審査申請のステップを続行します。
-
待ち時間ゼロのコスト
2. GitFlow Release フローと App リリースのタイミングの同期
以前:
GitFlowの最終リリース時には、developブランチをmasterブランチにマージする必要があります。masterブランチは現在の本番バージョンを表しています。
これまでは定期的に手動または自動で実行していました。例えば、月曜日の午後にAppをリリースし、月曜日に決まってdevelopからmasterへマージするなどです。手動実行は面倒で、自動実行の場合は延期したらどうする?月曜日がちょうど休日だったら?実際にはAppがリリースされていないのに、先にdevelopをmasterにマージしてしまう問題がありました。
ほとんどの場合は重要ではありませんが、例えばこの期間中にホットフィックスを挟むような極端な状況では差異が生じる可能性があります。しかし、完全で安定したCI/CD開発プロセスを追求する場合、これは検討に値するケースです。
別の方法として、「App is Ready for Sale 通知メールをGmailフィルターとGoogle Apps Scriptでトリガーする」も可能です。
After:

-
Webhookがあれば、Appの公開通知を受け取った後に直接CI/CDアクション(MasterからDevelopへ)をトリガーできます。
-
Appが本当にリリースされたことを確認してからMasterに戻すことができます。
3. アプリリリースメッセージ
アプリがリリースされユーザーに公開された後、もう一つよくある内部ワークフローとして、関連チームへの通知、バージョンに含まれるタスクの共有、関連タスクの完了があります。
以前:
同様に、手動または定期的な自動実行、またはメールを使って Gmailフィルター+Google Apps Scriptでトリガーする 。
After:
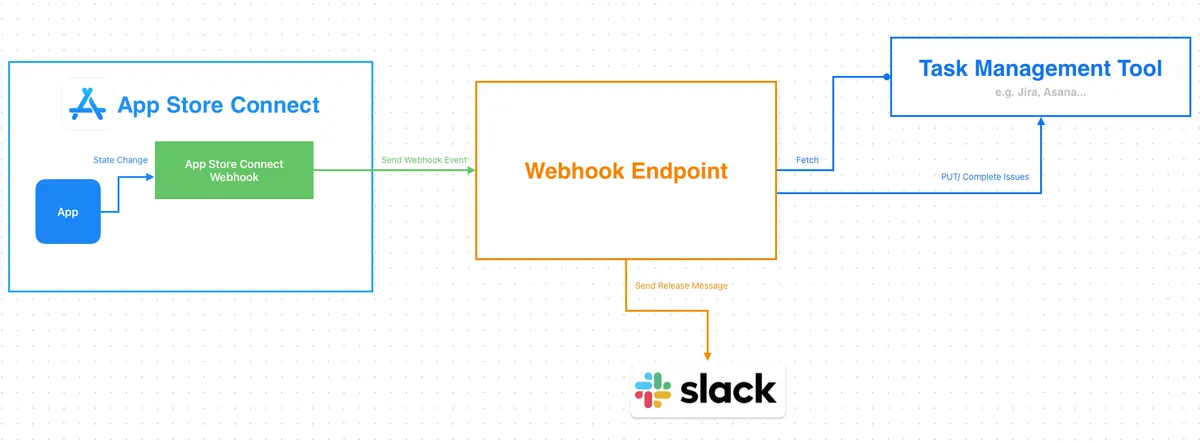
- Webhook を使うことで、App の公開通知を受け取った後に Jira や Asana の API と連携し、該当バージョンのチケットを一括で完了にし、完了したタスクのリリースメッセージを Slack に投稿できます。
4. ビルド失敗 / レビュー却下通知機能
前述の1、2で、以前はメール通知を通じてワークフローをトリガーすることが可能でしたが、大規模なチームで権限管理が厳しい組織では、iOS開発者は「開発者」バックエンド権限のみを持ち、リリースやApp管理ができないため、Appの状態変更に関するメール通知を受け取ることができません。これにはアップロードしたビルドの拒否や審査拒否の通知メールも含まれます。
以前:
以前は親切な人(別名PM)がメールをエンジニアに転送するしかなく、親切な人も気づかなければ、リリース直前になってAppが拒否されていることに気づくことがありました!
After:
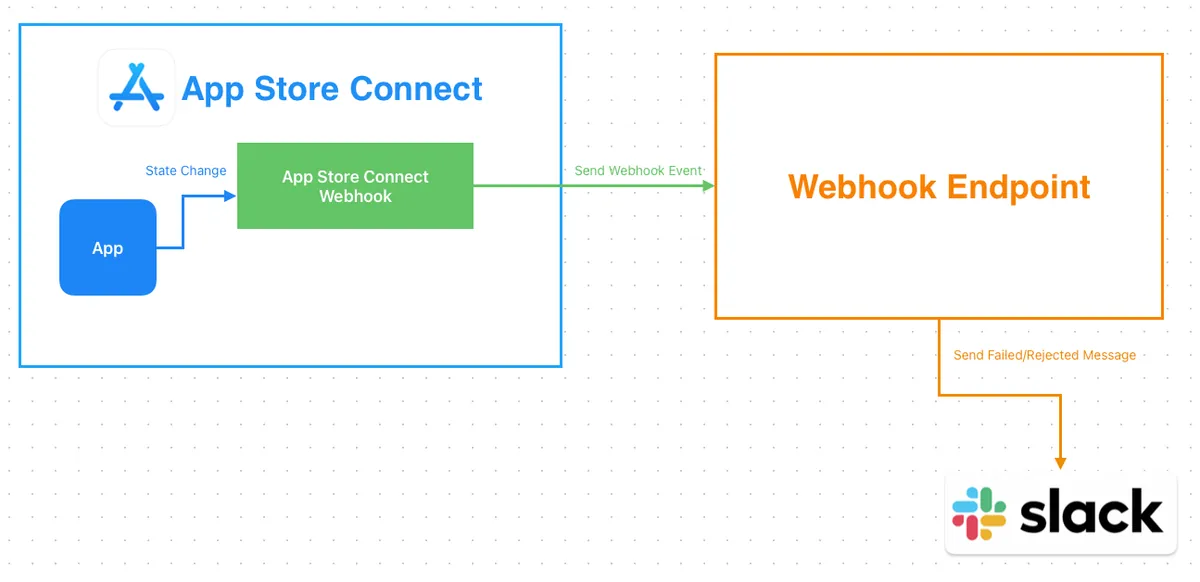
- このケースは比較的シンプルで、Webhook通知を受け取った後、メッセージをSlackに転送します。
5. Testflight フィードバック通知機能
4に似ていますが、TestFlightフィードバックWebhook通知に切り替えただけです。
以前:
従来、開発者は自分で App Store Connect の TestFlight 管理画面にアクセスしてテスターのフィードバックやクラッシュ問題を確認するしかなく、非常に見落としやすかった(1年前に報告された提案が1年後にようやく発見されたこともある)。
After:
- Testflight Feedback Webhook 通知を受け取った後、メッセージを Slack に転送する。
— — —
その他の活用方法も自由にアイデアを出してください。次に接続方法を紹介します。
App Store Connect API Webhook 設定
権限要件:Admin または Account Holder の権限が必要です。
App Store Connect API Webhook 通知の作成
-
「ユーザーとアクセス権限 (Users and Access)」 -> 「統合 (Integrations)」に移動してください。
-
「その他の統合 (Additional)」の下にある「Webhooks」をクリックしてください。
-
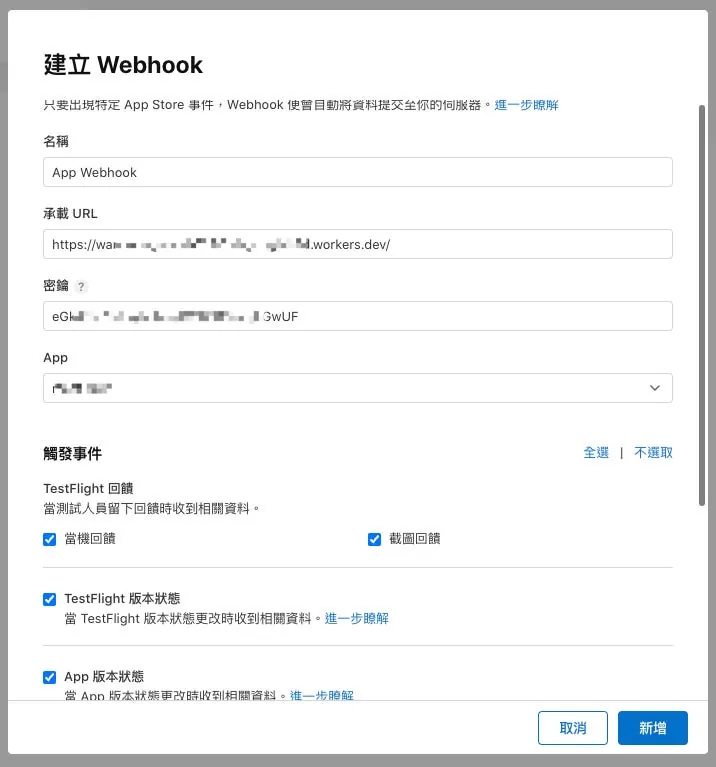
「Webhookを作成」ボタンをクリックしてください。
-
名称:Webhookの名前を入力してください
-
承載 URL(Payload URL):Webhook通知を受け取るサービスのURLを入力してください
-
密钥(Secret) 文字列:Webhookリクエスト検証用の秘密鍵(ランダムな文字列を生成して使用可能)
-
App:Webhook通知を受け取る対象のAppを選択してください
-
トリガーイベント:
TestFlight フィードバック
テスターがフィードバックを残したときに関連情報を受け取ります。
[] クラッシュフィードバック
[] スクリーンショットフィードバック

[] TestFlight バージョンステータス
TestFlight バージョンステータスが変更されたときに関連情報を受け取ります。詳細はこちら

[] App バージョンステータス
App バージョンステータスが変更されたときに関連情報を受け取ります。詳細はこちら

[] ビルドアップロードステータス
ビルドアップロードステータスが変更されたときに関連情報を受け取ります。詳細はこちら

背景素材
Apple がホストするアセットパッケージのバージョンに特定の変更があったときに関連情報を受け取ります。詳細はこちら

[] App Store 公開バージョンを更新
[] 外部 TestFlight 公開バージョンを更新
[] 内部 TestFlight 公開バージョンを作成
[] アセットパッケージバージョンを更新
必要に応じて項目を選択することも、すべて選択して通知を受け取った後に処理の要否を判断することもできます。
最後に「追加」をクリックしてWebhookを作成します。
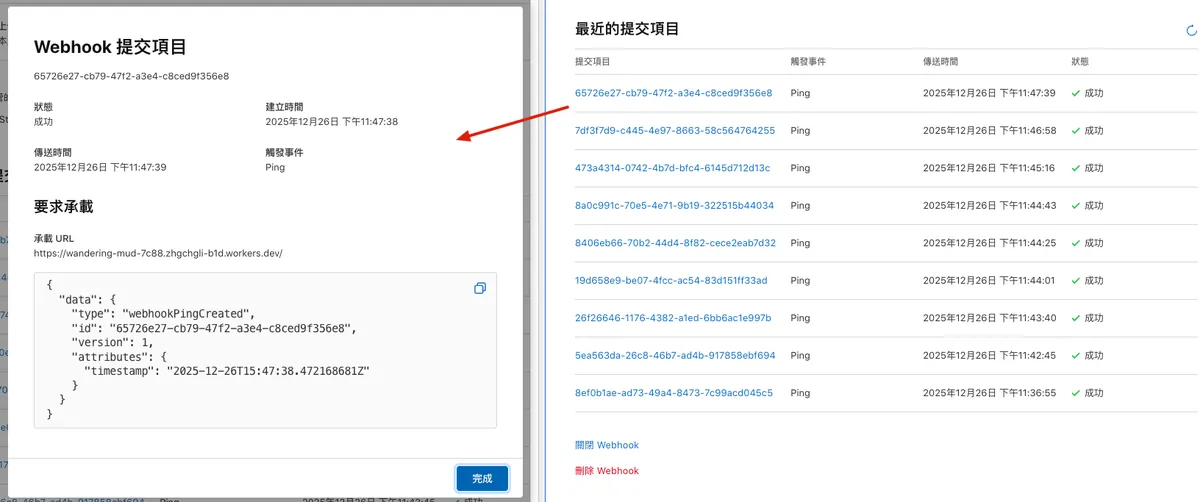
App Store Connect API Webhook 通知のテスト
Webhook ページに入る。
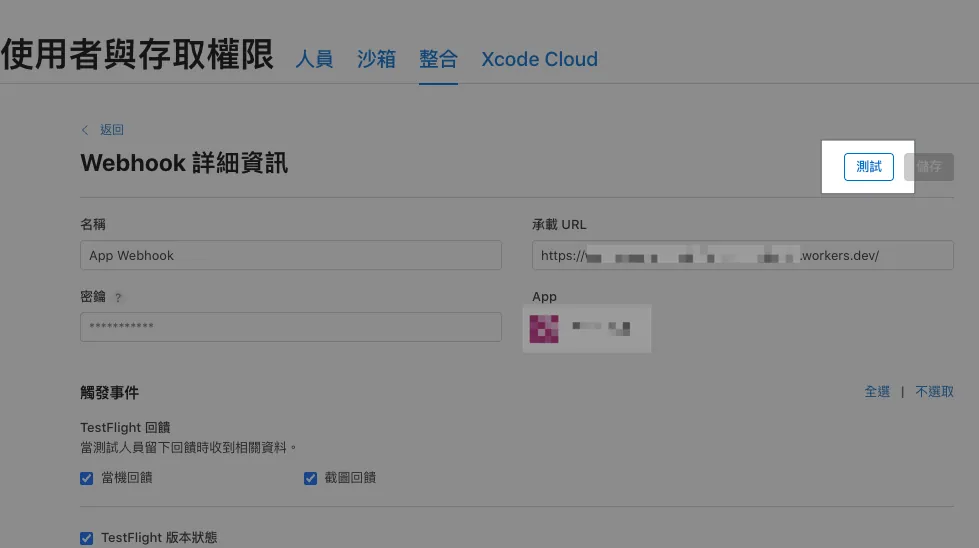
右上の「テスト」をクリックしてテスト通知を受け取ります。
テスト通知内容は以下の通りです:
Headers:
{
  "content-type": "application/json",
  "x-apple-jingle-correlation-key": "PNSCHDQW3MY2AX6VSRFHYYNUL4",
  "x-apple-request-uuid": "7b64238e-16db-31a0-5fd5-944a7c61b45f",
  "x-apple-signature": "hmacsha256=cf50020f0bbd3c5274860594f616f1806965c1f9fb765d8d278f512dff5b4c0e",
}

Body:
{
  "data" : {
    "type" : "webhookPingCreated",
    "id" : "65726e27-cb79-47f2-a3e4-c8ced9f356e8",
    "version" : 1,
    "attributes" : {
      "timestamp" : "2025-12-26T15:47:38.472168681Z"
    }
  }
}
App Store Connect API Webhook 通知送信履歴
Webhook ページ下部の「最近の送信項目」には、最近送信された Webhook イベントが表示されます。
App Store Connect API Webhook 通知の検証
Webhook を作成する際に「シークレット文字列」を入力します。リクエストの検証を推奨しており、この Webhook URL の漏洩を防ぎ、悪意のある第三者が自由に偽造して Webhook イベントをあなたのサービスに送信するのを防ぎます。
認証方法:
Request Body に対して設定したキー文字列で HMAC-SHA256 を計算し、HEX 形式の文字列を出力します。この文字列と Request Headers の
x-apple-signatureにあるhmacsha256=の後の文字列を比較します。
実装方法 — Nodejs:
import crypto from 'crypto';

function verifyAppleWebhook(rawBody, appleSignature, secret) {
  const hex = crypto
    .createHmac('sha256', secret)
    .update(rawBody, 'utf8')
    .digest('hex');

  return `hmacsha256=${hex}` === appleSignature;
}
実現方法 — Cloudflare Worker:
function bufferToHex(buffer) {
  return [...new Uint8Array(buffer)]
    .map(b => b.toString(16).padStart(2, '0'))
    .join('');
}

async function hmacSha256Hex(secret, message) {
  const enc = new TextEncoder();

  const key = await crypto.subtle.importKey(
    'raw',
    enc.encode(secret),
    { name: 'HMAC', hash: 'SHA-256' },
    false,
    ['sign']
  );

  const signature = await crypto.subtle.sign(
    'HMAC',
    key,
    enc.encode(message)
  );

  return bufferToHex(signature);
}

async function verifyAppleWebhook(request, secret) {
  const appleSignature = request.headers.get('X-Apple-Signature');

  const rawBody = await request.clone().text();
  const calculated = await hmacSha256Hex(secret, rawBody);

  return "hmacsha256="+calculated === appleSignature;
}
- Cloudflare Worker には crypto モジュールがないため、Web Crypto API(crypto.subtle)を使用する必要があります。
実装方法 — Google Apps Script Web App ❌
技術的な制限により、Google Apps Script Web App の doGet(e)/doPost(e) ではリクエストヘッダーを取得できないため、この方法でリクエスト元の検証はできません。
URLクエリにキーとなるパラメータを追加して、簡単な判定保護を行うことが最大限です。
App Store Connect API Webhook 通知 Payload
こちらでは、Appのアップロードや審査申請の過程で受け取るイベントPayloadをいくつか集めました。自動化開発の際に参考にしてください。
Webhook はイベントとステータス名のみを送信し、バージョン番号や審査拒否理由などの詳細情報は含まれません。完全な情報を取得するには、Event Payload 内の Relationships Link を使って自分で App Store Connect API を呼び出す必要があります。
ビルドバージョンアップロード — プロセス完了
{
  "data" : {
    "type" : "buildUploadStateUpdated",
    "id" : "xxx-xx-xx-xx-xxx",
    "version" : 1,
    "attributes" : {
      "oldState" : "PROCESSING",
      "newState" : "COMPLETE"
    },
    "relationships" : {
      "instance" : {
        "data" : {
          "type" : "buildUploads",
          "id" : "xxx-xx-xx-xx-xxx"
        },
        "links" : {
          "self" : "https://api.appstoreconnect.apple.com/v1/buildUploads/xxx-xx-xx-xx-xxx"
        }
      }
    }
  }
}
ビルドバージョンアップロード — 処理失敗
{
  "data": {
    "type": "buildUploadStateUpdated",
    "id": "xxx-xx-xx-xx-xxx",
    "version": 1,
    "attributes": {
      "oldState": "PROCESSING",
      "newState": "FAILED"
    },
    "relationships": {
      "instance": {
        "data": {
          "type": "buildUploads",
          "id": "xxx-xx-xx-xx-xxx"
        },
        "links": {
          "self": "https://api.appstoreconnect.apple.com/v1/buildUploads/xxx-xx-xx-xx-xxx"
        }
      }
    }
  }
}
ほとんどの場合、バイナリが拒否されます。例えば、マイクを使用しているのに宣言していないなどです。
App バージョンの状態 — Prepare For Submission(提出準備中)
{
  "data" : {
    "type" : "appStoreVersionAppVersionStateUpdated",
    "id" : "xxx-xx-xx-xx-xxx",
    "version" : 1,
    "attributes" : {
      "newValue" : "PREPARE_FOR_SUBMISSION",
      "oldValue" : "DEVELOPER_REJECTED",
      "timestamp" : "2025-12-18T05:01:47.118Z"
    },
    "relationships" : {
      "instance" : {
        "data" : {
          "type" : "appStoreVersions",
          "id" : "xxx-xx-xx-xx-xxx"
        },
        "links" : {
          "self" : "https://api.appstoreconnect.apple.com/v1/appStoreVersions/xxx-xx-xx-xx-xxx"
        }
      }
    }
  }
}
新しいバージョン番号が作成され、審査のために提出する準備ができた段階で、バージョン情報や更新内容を入力し、審査に提出するビルドを選択できます。
App バージョンのステータス — Ready For Review(審査準備完了)
{
  "data" : {
    "type" : "appStoreVersionAppVersionStateUpdated",
    "id" : "xxx-xx-xx-xx-xxx",
    "version" : 1,
    "attributes" : {
      "newValue" : "READY_FOR_REVIEW",
      "oldValue" : "PREPARE_FOR_SUBMISSION",
      "timestamp" : "2025-12-18T03:41:12.516Z"
    },
    "relationships" : {
      "instance" : {
        "data" : {
          "type" : "appStoreVersions",
          "id" : "xxx-xx-xx-xx-xxx"
        },
        "links" : {
          "self" : "https://api.appstoreconnect.apple.com/v1/appStoreVersions/xxx-xx-xx-xx-xxx"
        }
      }
    }
  }
}
審査用の資料が確定し、審査準備が整ったとき。
App バージョンの状態 — Waiting For Review(審査待ち)
{
  "data" : {
    "type" : "appStoreVersionAppVersionStateUpdated",
    "id" : "xxx-xx-xx-xx-xxx",
    "version" : 1,
    "attributes" : {
      "newValue" : "WAITING_FOR_REVIEW",
      "oldValue" : "READY_FOR_REVIEW",
      "timestamp" : "2025-12-18T03:41:21.179Z"
    },
    "relationships" : {
      "instance" : {
        "data" : {
          "type" : "appStoreVersions",
          "id" : "xxx-xx-xx-xx-xxx"
        },
        "links" : {
          "self" : "https://api.appstoreconnect.apple.com/v1/appStoreVersions/xxx-xx-xx-xx-xxx"
        }
      }
    }
  }
}
Appは審査提出が完了し、現在審査待ちの状態です。
App バージョンの状態 — Developer Rejected(開発者による拒否)
{
  "data" : {
    "type" : "appStoreVersionAppVersionStateUpdated",
    "id" : "xxx-xx-xx-xx-xxx",
    "version" : 1,
    "attributes" : {
      "newValue" : "DEVELOPER_REJECTED",
      "oldValue" : "WAITING_FOR_REVIEW",
      "timestamp" : "2025-12-18T03:50:30.552Z"
    },
    "relationships" : {
      "instance" : {
        "data" : {
          "type" : "appStoreVersions",
          "id" : "xxx-xx-xx-xx-xxx"
        },
        "links" : {
          "self" : "https://api.appstoreconnect.apple.com/v1/appStoreVersions/xxx-xx-xx-xx-xxx"
        }
      }
    }
  }
}
開発者が審査中のバージョンを取り下げる。
App バージョンのステータス — 審査中(公式による審査中)
{
  "data" : {
    "type" : "appStoreVersionAppVersionStateUpdated",
    "id" : "xxx-xx-xx-xx-xxx",
    "version" : 1,
    "attributes" : {
      "newValue" : "IN_REVIEW",
      "oldValue" : "WAITING_FOR_REVIEW",
      "timestamp" : "2025-12-18T22:05:50.038Z"
    },
    "relationships" : {
      "instance" : {
        "data" : {
          "type" : "appStoreVersions",
          "id" : "xxx-xx-xx-xx-xxx"
        },
        "links" : {
          "self" : "https://api.appstoreconnect.apple.com/v1/appStoreVersions/xxx-xx-xx-xx-xxx"
        }
      }
    }
  }
}
App バージョンの状態 — Pending Developer Release(審査完了、リリース待ち)
{
  "data" : {
    "type" : "appStoreVersionAppVersionStateUpdated",
    "id" : "xxx-xx-xx-xx-xxx",
    "version" : 1,
    "attributes" : {
      "newValue" : "PENDING_DEVELOPER_RELEASE",
      "oldValue" : "IN_REVIEW",
      "timestamp" : "2025-12-18T22:34:18.785Z"
    },
    "relationships" : {
      "instance" : {
        "data" : {
          "type" : "appStoreVersions",
          "id" : "xxx-xx-xx-xx-xxx"
        },
        "links" : {
          "self" : "https://api.appstoreconnect.apple.com/v1/appStoreVersions/xxx-xx-xx-xx-xxx"
        }
      }
    }
  }
}
Pending Developer Release イベントの時間から Waiting For Review イベントの時間を引くと、Appが審査提出からリリース可能な状態になるまでの待機時間になります。
App バージョンの状態 — Ready for Distribution (アプリ配信準備完了) 別名 Ready For Sale
{
  "data" : {
    "type" : "appStoreVersionAppVersionStateUpdated",
    "id" : "xxx-xx-xx-xx-xxx",
    "version" : 1,
    "attributes" : {
      "newValue" : "READY_FOR_DISTRIBUTION",
      "oldValue" : "PENDING_DEVELOPER_RELEASE",
      "timestamp" : "2025-12-23T06:03:50.925Z"
    },
    "relationships" : {
      "instance" : {
        "data" : {
          "type" : "appStoreVersions",
          "id" : "xxx-xx-xx-xx-xxx"
        },
        "links" : {
          "self" : "https://api.appstoreconnect.apple.com/v1/appStoreVersions/xxx-xx-xx-xx-xxx"
        }
      }
    }
  }
}
App はリリース準備完了(ほぼ Ready For Sale と同義で、Ready For Sale のイベントはありません)。
あなたのアプリは承認され、配布の準備が整いました。
アプリを配布するには、契約が有効である必要があります。アカウント所有者は、ビジネスセクションで最新の契約を承認できます。
App Store Connect API Webhook ワークフロー連携
方法 1 — Fastlaneを使ってApp Store Connect APIに接続する
こちらで最も速い方法は、直接CI/CDサービスでトリガーし、Fastlaneに内蔵されているSpaceshipを使ってApp Store Connect APIと連携することです。
もし元々 Fastlane で App Store Connect API を使って Match 証明書や審査提出を管理している場合、この方法はそのまま無痛で利用できます。使っていない場合は、まず 公式ドキュメント を参考にして API キーを作成し、CI/CD サービスのシークレットに安全に保存してください。
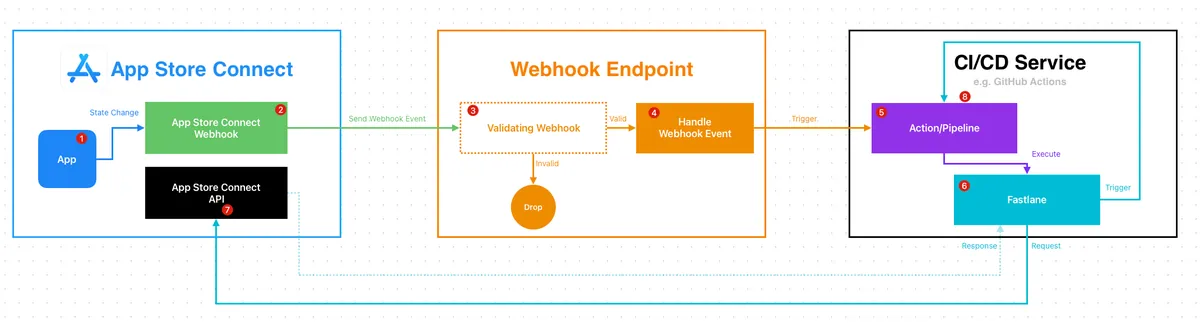
- App Store Connect
-
Appの状態が変わったとき
-
Webhookをトリガーする
- Webhook Endpoint
自社サービス/API または シンプルな FAAS サービス(Cloudflare Worker / AWS Lambda / Cloud Functions / Google Apps Script)でも構いません
-
Webhook の検証(オプション)
-
Webhook イベントの処理およびイベントリクエストを CI/CD サービスに転送して実行
例:GitHub API を使って GitHub Actions をトリガーする..
- CI/CDサービス
GitHub Actions / Bitbucket Pipeline / Gitlab Runner…
-
アクションをトリガーする
-
Fastlane スクリプトを実行し、Fastlane Spaceship 認証を再利用する
- App Store Connect
- App Store Connect API で完全な情報を取得する
- CI/CDサービス
- 続くステップ、例えば通知の送信や別のアクションのトリガー
Fastlaneの例:
  # 使用方法:
  #   bundle exec fastlane appStoreConnectWebhookHandler \
  #     data:'{"data":{"type":"buildUploadStateUpdated","id":"xxx-xxx-xxx-xx-xxx","version":1,"attributes":{"oldState":"PROCESSING","newState":"COMPLETE"},"relationships":{"instance":{"data":{"type":"buildUploads","id":"xxx-xxx-xxx-xx-xxx"},"links":{"self":"https://api.appstoreconnect.apple.com/v1/buildUploads/xxx-xxx-xxx-xx-xxx"}}}}}'
  # 注意事項:
  # - `data:` はJSON文字列である必要があります。
  # - このレーンはローカルデバッグ用です(GETレスポンスを表示します)。
  desc "[Automation] App Store ConnectのWebhookペイロードを処理し、ASC API経由で関連インスタンスを取得する"
  lane :appStoreConnectWebhookHandler do \\|options\\|
    begin
      data = options[:data]
      UI.user_error!("データがありません") if data.empty?
      data = JSON.parse(data)
      url = data.dig("data", "relationships", "instance", "links", "self").to_s.strip
      UI.user_error!("JSONにインスタンスのself URLがありません") if url.empty?

      api_key = app_store_connect_api_key(
        key_id: "xxxx",
        issuer_id: "xxxx-xxxx-xxxx-xxxx-165aa6465141",
        key_filepath: "./AuthKey_xxxx.p8",
        duration: 1200, # 任意(最大1200)
        in_house: false # 任意ですが、match/sigh使用時は必要な場合があります
      )

      loadAppStoreConnectAPIKey
      #
      uri = URI.parse(url)
      http = Net::HTTP.new(uri.host, uri.port)
      http.use_ssl = true
      http.verify_mode = OpenSSL::SSL::VERIFY_PEER
      store = OpenSSL::X509::Store.new
      store.set_default_paths
      http.cert_store = store

      request = Net::HTTP::Get.new(uri.request_uri)
      token = Spaceship::ConnectAPI.token
      UI.user_error!("App Store Connect APIトークンが利用できません。app_store_connect_api_keyの設定を確認してください。") if token.nil?
      request['Authorization'] = "Bearer #{token.text}"

      request['Content-Type'] = 'application/json'
      request['Accept'] = 'application/json'

      response = http.request(request)
      UI.message("📡 GET #{url} レスポンス: [#{response.code}] #{response.message}")
      UI.message(response.body)
      #

      response
      ## レスポンス処理...次のアクションを実行...

    rescue => e
        UI.error("❌ App Store Connect API Webhookの処理に失敗しました: #{e}")
    end

  end
方法 2— Webhook エンドポイントで自分で処理する
二つ目の方法はWebhookエンドポイントのサービス上で全ての処理を完結させることですが、欠点はApp Store Connect APIキーをサービスに置く必要があり、自分でトークン検証を行わなければならないことです。
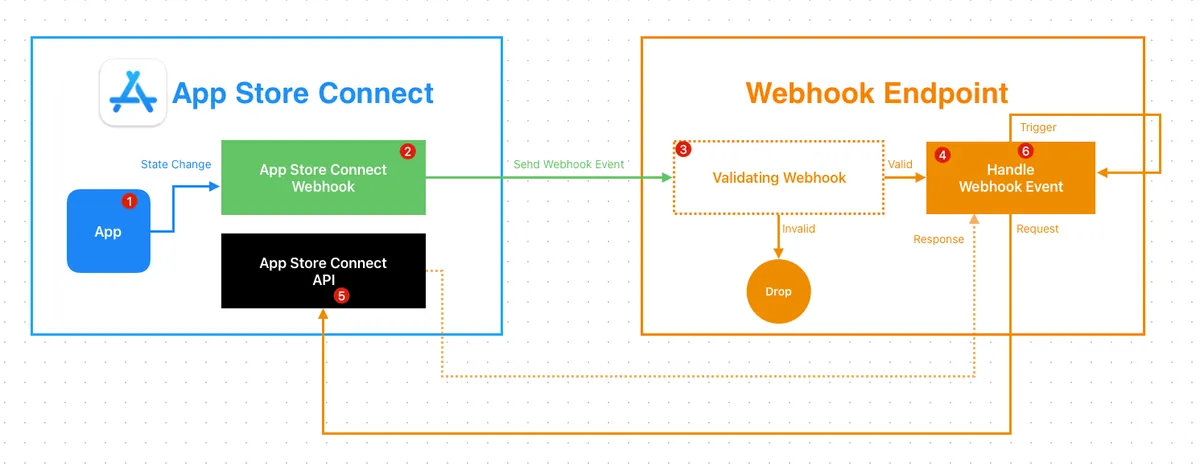
Rubyの例:
require 'jwt'
require 'net/http'
require 'time'

keyFile = File.read('./AuthKey_XXXX.p8') # あなたの.p8秘密鍵ファイルに置き換えてください(App Store Connectからダウンロード)
privateKey = OpenSSL::PKey::EC.new(keyFile)

payload = {
            iss: 'YOUR_ISSUE_ID', # あなたのIssuer IDに置き換えてください(App Store Connectのユーザーアクセス->キー->App Store Connect APIページで取得)
            iat: Time.now.to_i,
            exp: Time.now.to_i + 60*20,
            aud: 'appstoreconnect-v1'
          }

token = JWT.encode payload, privateKey, 'ES256', header_fields={kid:"YOUR_KEY_ID", typ:"JWT"} # あなたのKey IDに置き換えてください(App Store Connectのユーザーアクセス->キー->App Store Connect APIページで取得)
puts token

decoded_token = JWT.decode token, privateKey, true, { algorithm: 'ES256' }
puts decoded_token

# Webhook Payload内のrelationshipsリンクに置き換えてください
uri = URI("https://api.appstoreconnect.apple.com/v1/apps/APPID/customerReviews") # APPIDをApp Store ConnectのあなたのアプリIDに置き換えてください -> あなたのアプリ -> アプリ情報 -> Apple ID
https = Net::HTTP.new(uri.host, uri.port)
https.use_ssl = true

request = Net::HTTP::Get.new(uri)
request['Authorization'] = "Bearer #{token}";

response = https.request(request)
puts response.read_body
App Store Connect APIキーの生成方法、トークンの生成方法、APIの使用については「App Store Connect API 現已支援 讀取和管理 Customer Reviews」を参照してください。
App Store Connect APIのレスポンス
ここでは、Webhookイベントを受け取った後にRelationships Linkを使って完全な情報を取得する際のレスポンス例をいくつか紹介します。
ビルドバージョンアップロード — プロセス完了
https://api.appstoreconnect.apple.com/v1/buildUploads/xxx-xx-xx-xx-xxx
{
  "data": {
    "type": "buildUploads",
    "id": "xx-xx-xx-xxx-xx",
    "attributes": {
      "cfBundleShortVersionString": "1.101.0",
      "cfBundleVersion": "1",
      "createdDate": "2025-12-25T08:26:43-08:00",
      "state": {
        "errors": [],
        "warnings": [],
        "infos": [],
        "state": "COMPLETE"
      },
      "platform": "IOS",
      "uploadedDate": "2025-12-25T08:28:35-08:00"
    },
    "relationships": {
      "buildUploadFiles": {
        "links": {
          "self": "https://api.appstoreconnect.apple.com/v1/buildUploads/xx-xx-xx-xxx-xx/relationships/buildUploadFiles",
          "related": "https://api.appstoreconnect.apple.com/v1/buildUploads/xx-xx-xx-xxx-xx/buildUploadFiles"
        }
      }
    },
    "links": {
      "self": "https://api.appstoreconnect.apple.com/v1/buildUploads/xx-xx-xx-xxx-xx"
    }
  },
  "links": {
    "self": "https://api.appstoreconnect.apple.com/v1/buildUploads/xx-xx-xx-xxx-xx"
  }
}
ビルドバージョンアップロード — 処理失敗
https://api.appstoreconnect.apple.com/v1/buildUploads/xxx-xx-xx-xx-xxx
{
  "data": {
    "type": "buildUploads",
    "id": "xx-xx-xx-xx-xxx",
    "attributes": {
      "cfBundleShortVersionString": "1.101.0",
      "cfBundleVersion": "3",
      "createdDate": "2025-12-12T09:03:32-08:00",
      "state": {
        "errors": [
          {
            "code": "90683",
            "description": "Info.plistに目的の文字列がありません。アプリのコードは、機密ユーザーデータにアクセスする1つ以上のAPIを参照しているか、またはそのようなアクセスを許可する1つ以上の権利を持っています。“My.app”バンドルのInfo.plistファイルには、アプリがデータを必要とする理由を明確かつ完全に説明するユーザー向けの目的文字列を含むNSMicrophoneUsageDescriptionキーが必要です。外部ライブラリやSDKを使用している場合、それらが目的文字列を必要とするAPIを参照している可能性があります。アプリがこれらのAPIを使用していなくても、目的文字列は必要です。詳細は以下をご覧ください:https://developer.apple.com/documentation/uikit/protecting_the_user_s_privacy/requesting_access_to_protected_resources."
          }
        ],
        "warnings": [],
        "infos": [],
        "state": "FAILED"
      },
      "platform": "IOS",
      "uploadedDate": "2025-12-12T09:05:26-08:00"
    },
    "relationships": {
      "buildUploadFiles": {
        "links": {
          "self": "https://api.appstoreconnect.apple.com/v1/buildUploads/xx-xx-xx-xx-xxx/relationships/buildUploadFiles",
          "related": "https://api.appstoreconnect.apple.com/v1/buildUploads/xx-xx-xx-xx-xxx/buildUploadFiles"
        }
      }
    },
    "links": {
      "self": "https://api.appstoreconnect.apple.com/v1/buildUploads/xx-xx-xx-xx-xxx"
    }
  },
  "links": {
    "self": "https://api.appstoreconnect.apple.com/v1/buildUploads/xx-xx-xx-xx-xxx"
  }
}
ITMS-90683 を例にします。
App バージョンのステータス
https://api.appstoreconnect.apple.com/v1/appStoreVersions/xxx-xx-xx-xx-xxx
{
  "data": {
    "type": "appStoreVersions",
    "id": "xxx-xxx-xxx-xxx",
    "attributes": {
      "platform": "IOS",
      "versionString": "1.101.0",
      "appStoreState": "READY_FOR_SALE",
      "appVersionState": "READY_FOR_DISTRIBUTION",
      "copyright": "© 2025 ZhgChgLi.",
      "reviewType": "APP_STORE",
      "releaseType": "MANUAL",
      "earliestReleaseDate": null,
      "usesIdfa": null,
      "downloadable": true,
      "createdDate": "2025-12-15T19:12:55-08:00"
    },
    "relationships": {
      "ageRatingDeclaration": {
        "links": {
          "self": "https://api.appstoreconnect.apple.com/v1/appStoreVersions/xxx-xxx-xxx-xxx/relationships/ageRatingDeclaration",
          "related": "https://api.appstoreconnect.apple.com/v1/appStoreVersions/xxx-xxx-xxx-xxx/ageRatingDeclaration"
        }
      },
      "appStoreVersionLocalizations": {
        "links": {
          "self": "https://api.appstoreconnect.apple.com/v1/appStoreVersions/xxx-xxx-xxx-xxx/relationships/appStoreVersionLocalizations",
          "related": "https://api.appstoreconnect.apple.com/v1/appStoreVersions/xxx-xxx-xxx-xxx/appStoreVersionLocalizations"
        }
      },
      "build": {
        "links": {
          "self": "https://api.appstoreconnect.apple.com/v1/appStoreVersions/xxx-xxx-xxx-xxx/relationships/build",
          "related": "https://api.appstoreconnect.apple.com/v1/appStoreVersions/xxx-xxx-xxx-xxx/build"
        }
      },
      "appStoreVersionPhasedRelease": {
        "links": {
          "self": "https://api.appstoreconnect.apple.com/v1/appStoreVersions/xxx-xxx-xxx-xxx/relationships/appStoreVersionPhasedRelease",
          "related": "https://api.appstoreconnect.apple.com/v1/appStoreVersions/xxx-xxx-xxx-xxx/appStoreVersionPhasedRelease"
        }
      },
      "gameCenterAppVersion": {
        "links": {
          "self": "https://api.appstoreconnect.apple.com/v1/appStoreVersions/xxx-xxx-xxx-xxx/relationships/gameCenterAppVersion",
          "related": "https://api.appstoreconnect.apple.com/v1/appStoreVersions/xxx-xxx-xxx-xxx/gameCenterAppVersion"
        }
      },
      "routingAppCoverage": {
        "links": {
          "self": "https://api.appstoreconnect.apple.com/v1/appStoreVersions/xxx-xxx-xxx-xxx/relationships/routingAppCoverage",
          "related": "https://api.appstoreconnect.apple.com/v1/appStoreVersions/xxx-xxx-xxx-xxx/routingAppCoverage"
        }
      },
      "appStoreReviewDetail": {
        "links": {
          "self": "https://api.appstoreconnect.apple.com/v1/appStoreVersions/xxx-xxx-xxx-xxx/relationships/appStoreReviewDetail",
          "related": "https://api.appstoreconnect.apple.com/v1/appStoreVersions/xxx-xxx-xxx-xxx/appStoreReviewDetail"
        }
      },
      "appStoreVersionSubmission": {
        "links": {
          "self": "https://api.appstoreconnect.apple.com/v1/appStoreVersions/xxx-xxx-xxx-xxx/relationships/appStoreVersionSubmission",
          "related": "https://api.appstoreconnect.apple.com/v1/appStoreVersions/xxx-xxx-xxx-xxx/appStoreVersionSubmission"
        }
      },
      "appClipDefaultExperience": {
        "links": {
          "self": "https://api.appstoreconnect.apple.com/v1/appStoreVersions/xxx-xxx-xxx-xxx/relationships/appClipDefaultExperience",
          "related": "https://api.appstoreconnect.apple.com/v1/appStoreVersions/xxx-xxx-xxx-xxx/appClipDefaultExperience"
        }
      },
      "appStoreVersionExperiments": {
        "links": {
          "self": "https://api.appstoreconnect.apple.com/v1/appStoreVersions/xxx-xxx-xxx-xxx/relationships/appStoreVersionExperiments",
          "related": "https://api.appstoreconnect.apple.com/v1/appStoreVersions/xxx-xxx-xxx-xxx/appStoreVersionExperiments"
        }
      },
      "appStoreVersionExperimentsV2": {
        "links": {
          "self": "https://api.appstoreconnect.apple.com/v1/appStoreVersions/xxx-xxx-xxx-xxx/relationships/appStoreVersionExperimentsV2",
          "related": "https://api.appstoreconnect.apple.com/v1/appStoreVersions/xxx-xxx-xxx-xxx/appStoreVersionExperimentsV2"
        }
      },
      "customerReviews": {
        "links": {
          "self": "https://api.appstoreconnect.apple.com/v1/appStoreVersions/xxx-xxx-xxx-xxx/relationships/customerReviews",
          "related": "https://api.appstoreconnect.apple.com/v1/appStoreVersions/xxx-xxx-xxx-xxx/customerReviews"
        }
      },
      "alternativeDistributionPackage": {
        "links": {
          "self": "https://api.appstoreconnect.apple.com/v1/appStoreVersions/xxx-xxx-xxx-xxx/relationships/alternativeDistributionPackage",
          "related": "https://api.appstoreconnect.apple.com/v1/appStoreVersions/xxx-xxx-xxx-xxx/alternativeDistributionPackage"
        }
      }
    },
    "links": {
      "self": "https://api.appstoreconnect.apple.com/v1/appStoreVersions/xxx-xxx-xxx-xxx"
    }
  },
  "links": {
    "self": "https://api.appstoreconnect.apple.com/v1/appStoreVersions/xxx-xxx-xxx-xxx"
  }
}
前述の通り、詳細なApp情報、バージョン番号、エラー原因はAPIを呼び出して取得する必要があります。
完了
これで App Store Connect API の Webhook を使って、App の CI/CD と自動化ワークフローをより良く整備し、チームの開発効率を向上させることができます。
関連記事
Post Mediumから変換 by ZMediumToMarkdown.


コメント