
[iOS] NSAttributedString で NSTextList または NSTextTab を使ったリストのインデント実装の探求
iOS SwiftでNSAttributedStringのNSTextListまたはNSTextTabを使ってHTMLのOL/UL/LIのようなリストのインデント機能を実装する方法
技術的背景
以前、私のオープンソースプロジェクト「ZMarkupParser」を開発していた際、HTML文字列をNSAttributedStringオブジェクトに変換するライブラリで、NSAttributedStringだけで異なるHTMLコンポーネントを実装する必要がありました。そのときに初めてNSAttributedString Attributesの.paragraphStyle: NSParagraphStyle内のtextLists: [NSTextList]とtabStops: [NSTextTab]という、非常にマイナーでネット上の情報が少ない2つのプロパティに触れました。
当初HTMLリストのインデント変換を実装する際に、この2つの属性を使って実現できる例を見つけました。まずはHTMLリストのインデントのネストタグ構造を見てみましょう:
<ul>
    <li>ZMarkupParserは、HTML文字列をカスタマイズされたスタイルとタグでNSAttributedStringに変換する純粋なSwiftライブラリです。</li>
    <li>ZMarkupParserは、HTML文字列をカスタマイズされたスタイルとタグでNSAttributedStringに変換する純粋なSwiftライブラリです。</li>
    <li>
        ZMarkupParserは、HTML文字列をカスタマイズされたスタイルとタグでNSAttributedStringに変換する純粋なSwiftライブラリです。
        <ol>
            <li>ZMarkupParserは、HTML文字列をカスタマイズされたスタイルとタグでNSAttributedStringに変換する純粋なSwiftライブラリです。</li>
            <li>ZMarkupParserは、HTML文字列をカスタマイズされたスタイルとタグでNSAttributedStringに変換する純粋なSwiftライブラリです。</li>
            <li>ZMarkupParserは、HTML文字列をカスタマイズされたスタイルとタグでNSAttributedStringに変換する純粋なSwiftライブラリです。</li>
        </ol>
    </li>
</ul>
ブラウザでの表示結果:
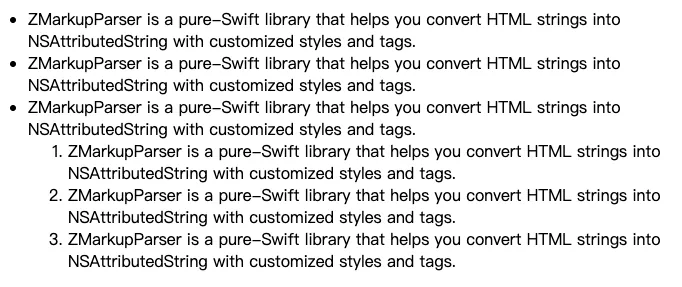
上図のように、リストは多層のネスト構造をサポートしており、階層に応じたインデントが必要です。
その当時は他の多くのHTMLタグ変換作業もあり、作業量が多かったため、NSTextListやNSTextTabを使ってリストのインデントを簡単に試しただけで、深く理解していませんでした。しかし、結果は期待外れで、間隔が大きすぎたり、揃わなかったり、複数行で崩れたり、ネスト構造がわかりにくく、間隔の調整もできませんでした。少し試してみて解決策が見つからなかったため、暫定的に手作業でレイアウトしました:
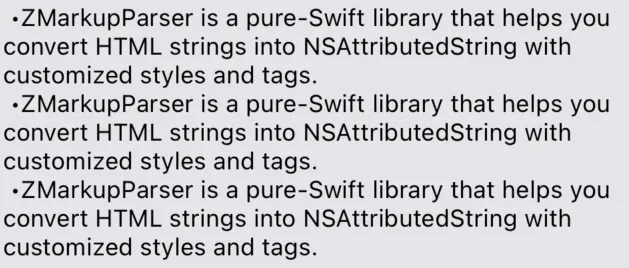
上の図の効果は非常に悪いです。実際には空白と記号「-」を手動でレイアウトしているため、インデント効果はありません。唯一の利点は、間隔が空白文字で構成されており、サイズを自由に調整できることです。
この件はそのまま放置され、オープンソース化してから一年以上経っても特に修正しませんでした。しかし最近になって、リスト変換の改善を望むIssuesが次々と寄せられ、開発者から解決PRも提供されました。そのPRの中での NSParagraphStyle の使い方を参考にして、改めて新たな発見がありました。NSTextListやNSTextTabを研究すれば、完璧なインデントリスト機能が実現できる可能性があると気づきました!
最終成果
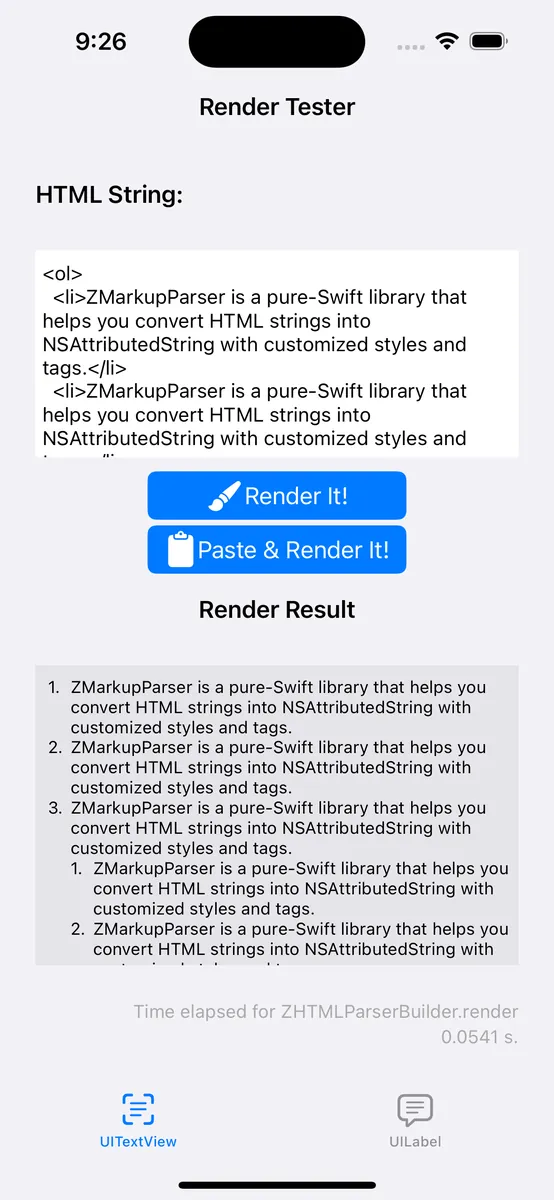
いつものように、まずは完成図を掲載します。
-
現在 ZMarkupParser ~>
v1.9.4以上のバージョンで、HTMLのリストアイテムを完璧に NSAttributedString オブジェクトに変換できます。 -
改行をサポートし、インデントを維持する
-
カスタムインデント間隔のサポート
-
ネスト構造のインデントをサポートする
-
異なるリストアイテムスタイルのサポート(箇条書き、黒丸、数字…さらにはカスタムシンボルも)
本文では、iOSのSwiftでNSAttributedStringのNSTextListやNSTextTab属性を使い、HTMLのOL/UL/LIのようなリストのインデント機能を実装する方法を探ります。筆者はオープンソースプロジェクトZMarkupParserの開発中にNSTextListを使ってリストのインデントを試みましたが、項目記号の間隔やネスト構造の効果が満足できず、手動で空白文字を使ったレイアウトに切り替えました。その後、コミュニティからのPRを参考に再度両者の使い方を研究し、NSTextListは簡単にネストリストを増やせるものの、間隔やカスタマイズ性に欠け、数字の項目に点を付けることができないことが分かりました。一方、NSTextTabはtabStops、headIndent、defaultTabIntervalを設定することで、インデント位置や項目記号の間隔を正確に制御でき、多層ネストのインデントやカスタム記号にも対応可能です。筆者は完全な再帰計算と組み合わせのサンプルコードを提供し、ニーズに完璧に合ったリストのインデント効果を実現しました。まとめると、NSTextListは使い方が簡単ですが柔軟性に欠け、NSTextTabは複雑ながらカスタマイズ性が高く、NSAttributedStringでリストのインデントを実装する鍵となる技術です。
NSTextList または NSTextTab を使ったリストインデントの実装方法検証
「または」であり「かつ」ではありません。NSTextList と NSTextTab は一緒に使う関係ではなく、どちらの属性も個別にリストのインデント機能を実現できます。
方法(1) NSTextListを使ったリストインデントの実装方法検討
let listLevel1ParagraphStyle = NSMutableParagraphStyle()
listLevel1ParagraphStyle.textLists = [textListLevel1]

let listLevel2ParagraphStyle = NSMutableParagraphStyle()
listLevel2ParagraphStyle.textLists = [textListLevel1, textListLevel2]

let attributedString = NSMutableAttributedString()
attributedString.append(NSAttributedString(string: "\t\(textListLevel1.marker(forItemNumber: 1))\tリストレベル1 - 1 文字列文字列文字列文字列文字列文字列文字列文字列文字列文字列文字列\n", attributes: [.paragraphStyle: listLevel1ParagraphStyle]))
attributedString.append(NSAttributedString(string: "\t\(textListLevel1.marker(forItemNumber: 2))\tリストレベル1 - 2\n", attributes: [.paragraphStyle: listLevel1ParagraphStyle]))
attributedString.append(NSAttributedString(string: "\t\(textListLevel1.marker(forItemNumber: 3))\tリストレベル1 - 3\n", attributes: [.paragraphStyle: listLevel1ParagraphStyle]))
attributedString.append(NSAttributedString(string: "\t\(textListLevel2.marker(forItemNumber: 1))\tリストレベル2 - 1\n", attributes: [.paragraphStyle: listLevel2ParagraphStyle]))
attributedString.append(NSAttributedString(string: "\t\(textListLevel2.marker(forItemNumber: 2))\tリストレベル2 - 2 文字列文字列文字列文字列文字列文字列文字列文字列文字列文字列文字列\n", attributes: [.paragraphStyle: listLevel2ParagraphStyle]))
attributedString.append(NSAttributedString(string: "\t\(textListLevel1.marker(forItemNumber: 4))\tリストレベル1 - 4\n", attributes: [.paragraphStyle: listLevel1ParagraphStyle]))

textView.attributedText = attributedString
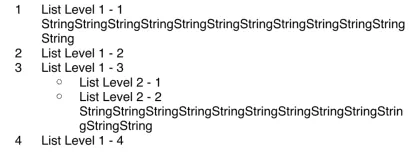
表示結果:
NSTextList が提供する Public API は非常に少なく、制御できるパラメータは以下の通りです:
// アイテム表示スタイル
var markerFormat: NSTextList.MarkerFormat { get }

// 有序アイテムの開始番号、何から始めるか
var startingItemNumber: Int

// 有序数字アイテムかどうか (iOS >= 16 で利用可能、このAPIは更新されている)
@available(iOS 16.0, *)
open var isOrdered: Bool { get }

// アイテム番号を渡してマーカー文字列を返す。有序数字アイテムでない場合は省略可能
open func marker(forItemNumber itemNumber: Int) -> String
NSTextList.MarkerFormat スタイル対応表:
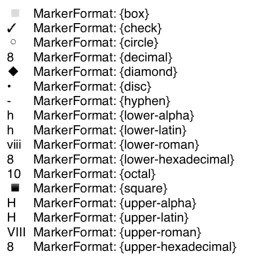
- 識別度を高めるために、リストの位置を8に設定して表示します。
使用方法:
// NSMutableParagraphStyle を定義
let listLevel1ParagraphStyle = NSMutableParagraphStyle()
// リストアイテムのスタイルと項目の開始位置を定義
let textListLevel1 = NSTextList(markerFormat: .decimal, startingItemNumber: 1)
// NSTextList を textLists 配列に割り当て
listLevel1ParagraphStyle.textLists = [textListLevel1]
//
NSAttributedString(string: "\t\(textListLevel1.marker(forItemNumber: 1))\項目一\n", attributes: [.paragraphStyle: listLevel1ParagraphStyle])

// ネストされた子項目を追加:
// 子項目のリストアイテムスタイルと開始位置を定義
let textListLevel2 = NSTextList(markerFormat: .circle, startingItemNumber: 1)
// 子項目用 NSMutableParagraphStyle を定義
let listLevel2ParagraphStyle = NSMutableParagraphStyle()
// 親と子の NSTextList を textLists 配列に割り当て
listLevel1ParagraphStyle.textLists = [textListLevel1, textListLevel2]

NSAttributedString(string: "\t\(textListLevel1.marker(forItemNumber: 1))\項目一之一\n", attributes: [.paragraphStyle: listLevel2ParagraphStyle])

// ネストされた子項目のさらに子項目...
NSTextList を textLists 配列に追加し続ければよい
-
\nを使って各リスト項目を区切る -
\t項目符号\tを使用する目的は、attributedString.stringでプレーンテキストの文字列にアクセスしたときにもリストの結果を得られるようにするためです。 -
\t項目符号\tは表示されないため、項目符号の後に何を加工しても表示されません(例:.を追加しても表示に影響しません)
使用上の問題:
-
項目記号の左右の間隔を制御できない
-
項目記号のカスタマイズができず、数字の項目に
.を付けられない ->1. -
親項目リストが非順序リスト(例:
.circle)で、子項目が順序付き数字リスト(例:.decimal)の場合、子項目のstartingItemNumberの設定が無効になることを確認しました。
NSTextList でできることは上述の通りですが、実際の製品開発ではあまり使いやすくありません。間隔が広すぎたり、数字項目に . が付かないため実用性が大きく減ります。ネット上で見つかったのは TextKit NSTextStorage を使って間隔を変更する方法 だけですが、この方法はハードコーディングすぎると感じて諦めました。唯一の利点は、複雑なレイアウト計算をせずに Append textLists 配列で簡単にネストされた子リストを追加できることです。
方法(2) NSTextTab を使ったリストのインデント方法の検証
NSTextTab は \t タブの占有位置を設定でき、デフォルトの間隔は 28 です。
私たちは NSMutableParagraphStyle の tabStops + headIndent + defaultTabInterval を設定することで、リストのようなインデント効果を実現しています。
let textListLevel1 = NSTextList(markerFormat: .decimal, startingItemNumber: 1)
let textListLevel2 = NSTextList(markerFormat: .circle, startingItemNumber: 1)
let listLevel1ParagraphStyle = NSMutableParagraphStyle()
listLevel1ParagraphStyle.defaultTabInterval = 28
listLevel1ParagraphStyle.headIndent = 29
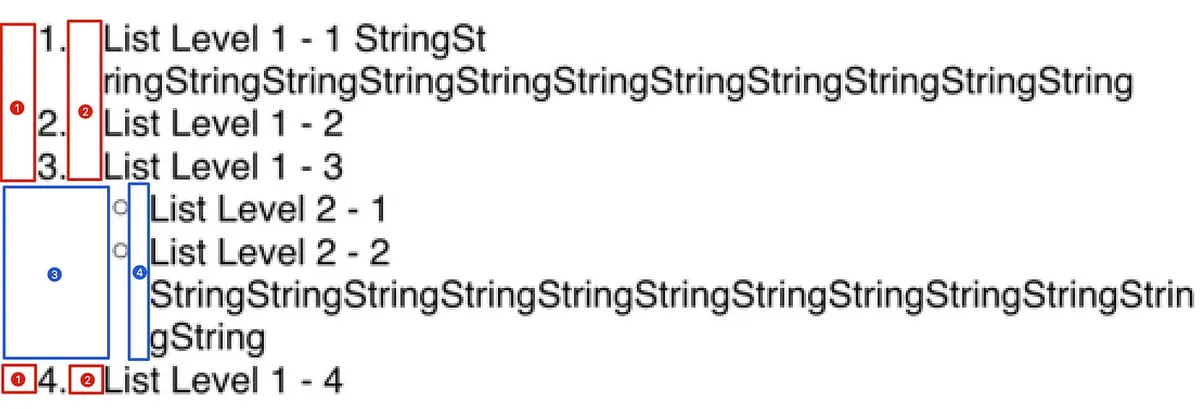
listLevel1ParagraphStyle.tabStops = [
NSTextTab(textAlignment: .left, location: 8), // 図の(1)のLocationに対応する設定
NSTextTab(textAlignment: .left, location: 29), // 図の(2)のLocationに対応する設定
]
let listLevel2ParagraphStyle = NSMutableParagraphStyle()
listLevel2ParagraphStyle.defaultTabInterval = 28
listLevel2ParagraphStyle.headIndent = 44
listLevel2ParagraphStyle.tabStops = [
NSTextTab(textAlignment: .left, location: 29), // 図の(3)のLocationに対応する設定
NSTextTab(textAlignment: .left, location: 44), // 図の(4)のLocationに対応する設定
]
let attributedString = NSMutableAttributedString()
attributedString.append(NSAttributedString(string: "\t\(textListLevel1.marker(forItemNumber: 1)).\tList Level 1 - 1 StringStringStringStringStringStringStringStringStringStringStringString\n", attributes: [.paragraphStyle: listLevel1ParagraphStyle]))
attributedString.append(NSAttributedString(string: "\t\(textListLevel1.marker(forItemNumber: 2)).\tList Level 1 - 2\n", attributes: [.paragraphStyle: listLevel1ParagraphStyle]))
attributedString.append(NSAttributedString(string: "\t\(textListLevel1.marker(forItemNumber: 3)).\tList Level 1 - 3\n", attributes: [.paragraphStyle: listLevel1ParagraphStyle]))
attributedString.append(NSAttributedString(string: "\t\(textListLevel2.marker(forItemNumber: 1))\tList Level 2 - 1\n", attributes: [.paragraphStyle: listLevel2ParagraphStyle]))
attributedString.append(NSAttributedString(string: "\t\(textListLevel2.marker(forItemNumber: 2))\tList Level 2 - 2 StringStringStringStringStringStringStringStringStringStringStringString\n", attributes: [.paragraphStyle: listLevel2ParagraphStyle]))
attributedString.append(NSAttributedString(string: "\t\(textListLevel1.marker(forItemNumber: 4)).\tList Level 1 - 4\n", attributes: [.paragraphStyle: listLevel1ParagraphStyle]))
textView.attributedText = attributedString
-
tabStops配列はテキスト内の各\tに対応し、NSTextTabはアラインメントの方向や位置(幅ではなくテキスト内の位置です!)を設定できます。 -
headIndentは2行目以降の開始位置からの距離を設定し、通常は2つ目の\tの位置に設定します。これにより改行時に箇条書きの記号と揃います。 -
defaultTabIntervalはデフォルトの\tの間隔を設定します。文字列内に他の\tがある場合も、この設定に従って間隔が調整されます。 -
location:NSTextTab は方向と位置を指定するため、自分で位置を計算する必要があります。項目記号の幅(桁数も影響します)+間隔+親項目のインデント距離を計算して、上図のような効果を出せます。 -
項目記号は完全にカスタマイズ可能です。
-
もし
locationが間違っているか適合しない場合、直接改行が発生します。
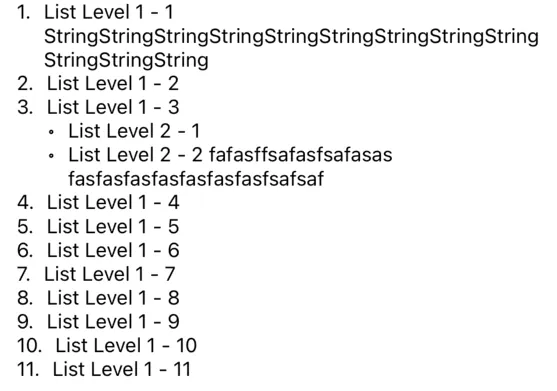
上記の例は NSTextTab のレイアウト方法を理解してもらうために、計算の合計過程を簡略化して結果を直接書いています。実際の場面で使う場合は以下の完全なコードを参考にしてください:
let attributedStringFont = UIFont.systemFont(ofSize: UIFont.systemFontSize)
let iterator = ListItemIterator(font: attributedStringFont)

//
let listItem = ListItem(type: .decimal, text: "", subItems: [
  ListItem(type: .circle, text: "List Level 1 - 1 StringStringStringStringStringStringStringStringStringStringStringString", subItems: []),
  ListItem(type: .circle, text: "List Level 1 - 2", subItems: []),
  ListItem(type: .circle, text: "List Level 1 - 3", subItems: [
    ListItem(type: .circle, text: "List Level 2 - 1", subItems: []),
    ListItem(type: .circle, text: "List Level 2 - 2 fafasffsafasfsafasas\tfasfasfasfasfasfasfasfsafsaf", subItems: [])
  ]),
  ListItem(type: .circle, text: "List Level 1 - 4", subItems: []),
  ListItem(type: .circle, text: "List Level 1 - 5", subItems: []),
  ListItem(type: .circle, text: "List Level 1 - 6", subItems: []),
  ListItem(type: .circle, text: "List Level 1 - 7", subItems: []),
  ListItem(type: .circle, text: "List Level 1 - 8", subItems: []),
  ListItem(type: .circle, text: "List Level 1 - 9", subItems: []),
  ListItem(type: .circle, text: "List Level 1 - 10", subItems: []),
  ListItem(type: .circle, text: "List Level 1 - 11", subItems: [])
])
let listItemIndent = ListItemIterator.ListItemIndent(preIndent: 8, sufIndent: 8)
textView.attributedText = iterator.start(item: listItem, type: .decimal, indent: listItemIndent)


//
private extension UIFont {
    func widthOf(string: String) -> CGFloat {
        return (string as NSString).size(withAttributes: [.font: self]).width
    }
}

private struct ListItemIterator {
    let font: UIFont

    struct ListItemIndent {
        let preIndent: CGFloat
        let sufIndent: CGFloat
    }

    func start(item: ListItem, type: NSTextList.MarkerFormat, indent: ListItemIndent) -> NSAttributedString {
        let textList = NSTextList(markerFormat: type, startingItemNumber: 1)
        return item.subItems.enumerated().reduce(NSMutableAttributedString()) { partialResult, listItem in
            partialResult.append(self.iterator(parentTextList: textList, parentIndent: indent.preIndent, sufIndent: indent.sufIndent, item: listItem.element, itemNumber: listItem.offset + 1))
            return partialResult
        }
    }

    private func iterator(parentTextList: NSTextList, parentIndent: CGFloat, sufIndent: CGFloat, item: ListItem, itemNumber:Int) -> NSAttributedString {
        let paragraphStyle = NSMutableParagraphStyle()


        // 例: 1.
        var itemSymbol = parentTextList.marker(forItemNumber: itemNumber)
        switch parentTextList.markerFormat {
        case .decimal, .uppercaseAlpha, .uppercaseLatin, .uppercaseRoman, .uppercaseHexadecimal, .lowercaseAlpha, .lowercaseLatin, .lowercaseRoman, .lowercaseHexadecimal:
            itemSymbol += "."
        default:
            break
        }

        // "1." の幅
        let itemSymbolIndent: CGFloat = ceil(font.widthOf(string: itemSymbol))

        let tabStops: [NSTextTab] = [
            .init(textAlignment: .left, location: parentIndent),
            .init(textAlignment: .left, location: parentIndent + itemSymbolIndent + sufIndent)
        ]

        let thisIndent = parentIndent + itemSymbolIndent + sufIndent
        paragraphStyle.headIndent = thisIndent
        paragraphStyle.tabStops = tabStops
        paragraphStyle.defaultTabInterval = 28

        let thisTextList = NSTextList(markerFormat: item.type, startingItemNumber: 1)
        //
        return item.subItems.enumerated().reduce(NSMutableAttributedString(string: "\t\(itemSymbol)\t\(item.text)\n", attributes: [.paragraphStyle: paragraphStyle, .font: font])) { partialResult, listItem in
            partialResult.append(self.iterator(parentTextList: thisTextList, parentIndent: thisIndent, sufIndent: sufIndent, item: listItem.element, itemNumber: listItem.offset + 1))
            return partialResult
        }
    }
}

private struct ListItem {
    var type: NSTextList.MarkerFormat
    var text: String
    var subItems: [ListItem]
}
-
私たちはシンプルな
ListItemオブジェクトを宣言し、子リスト項目をカプセル化します。再帰的に組み合わせて、リスト項目の間隔と内容を計算します。 -
NSTextListはリスト記号を生成するためにmarkerメソッドのみを使用しますが、自分で実装することも可能です。 -
項目記号の前後の幅を広げたい場合は、
preIndentとsufIndentを設定することで直接実現できます。 -
位置を計算する必要があるため、幅を計算するには
Fontを使用する必要があります。したがって、計算を正確に行うためにテキストに.fontを設定する必要があります。
完了
最初は NSTextList を直接使えば実現できると思っていましたが、効果もカスタマイズ性も非常に低かったです。最終的には NSTextTab を使い、\t の位置を調整して項目記号を自分で組み合わせる方法で対応しました。少し手間はかかりますが、効果は完璧に要件を満たしています!
目的は達成しましたが、依然として
NSTextTabの知識は完全に理解できていません(例えば、異なる方向や Location の相対位置など)。公式ドキュメントやネット上の情報が非常に少ないため、また機会があれば研究したいと思います。
本文の完全なサンプルダウンロード
広告
HTML文字列をNSAttributedStringに変換するツールで、カスタムスタイル指定やカスタムタグ機能に対応しています。
参考資料
- ObjC String Rendering / ObjC 中国 — 文字列レンダリング
この記事には NSAttributedString の完全な応用例があり、リストや表の機能実装についても紹介されています。
Post Mediumから変換、ZMediumToMarkdownによる。


コメント